We love seeing the 3D printing community and our customers working on various mods for Bambu Lab printers. Most of them are awesome and further improve on the design of our printers, but we want to share some feedback on some of the mods we have seen online.
Some mods presented in this article could generate damage to the printer, and in turn, the loss of under-warranty replacements or support. Other mods could impact the functionality of the printer, and cause issues during printing making your experience less enjoyable.
This article is meant to share some feedback on the mods we have seen online, and some potential issues we discovered from Customer Support tickets.
¶ Waste Chute Cover
The Waste Chute is the location where the filament is purged during filament changes or starts of the print before it is dropped outside the printer. There are some mods online that cover the chute with cover to better direct the purged filament but in some cases, these mods could generate issues.
Links to example Waste Chute Cover mods: 1, 2, 3
The Waste Chute has a flap that keeps the filament purge in one place to try and form it in a smaller “ball of filament”. Unfortunately, not all filaments behave the same way and it might be harder for the filament to drop through the chute outside the printer. Having a cover over the Waste Chute could block the exhaust and this can lead to print failures, and sometimes, to nozzle clogs or other damage to the print head.
We recommend not to cover the Waste Chute and simply use a regular box or a different collection method for the waste, to avoid the issues described.
¶ Chamber Exhaust Fan Cover/Muffler
The X1 has a Chamber Temperature Regulator Fan in the back of the printer which is used for keeping the chamber temperature low when using PLA filament. For PLA, it's important to ensure that the chamber temperature is as low as possible, to allow good cooling for PLA, and to also avoid Heat Creep on the hotend.
Heat Creep occurs when the temperature inside the chamber raises over the glass transition temperature of the filament, and leads to an extruder or hotend clog and a print failure.
Some customers have attached a Fan Cover/Muffler over the exhaust fan. Links to example Exhaust Fan Covers/Mufflers: 1, 2, 3, 4, 5
While this mod can make the fan more silent, it can also damage it because of the added back pressure which blocks the airflow, leading to a failure.
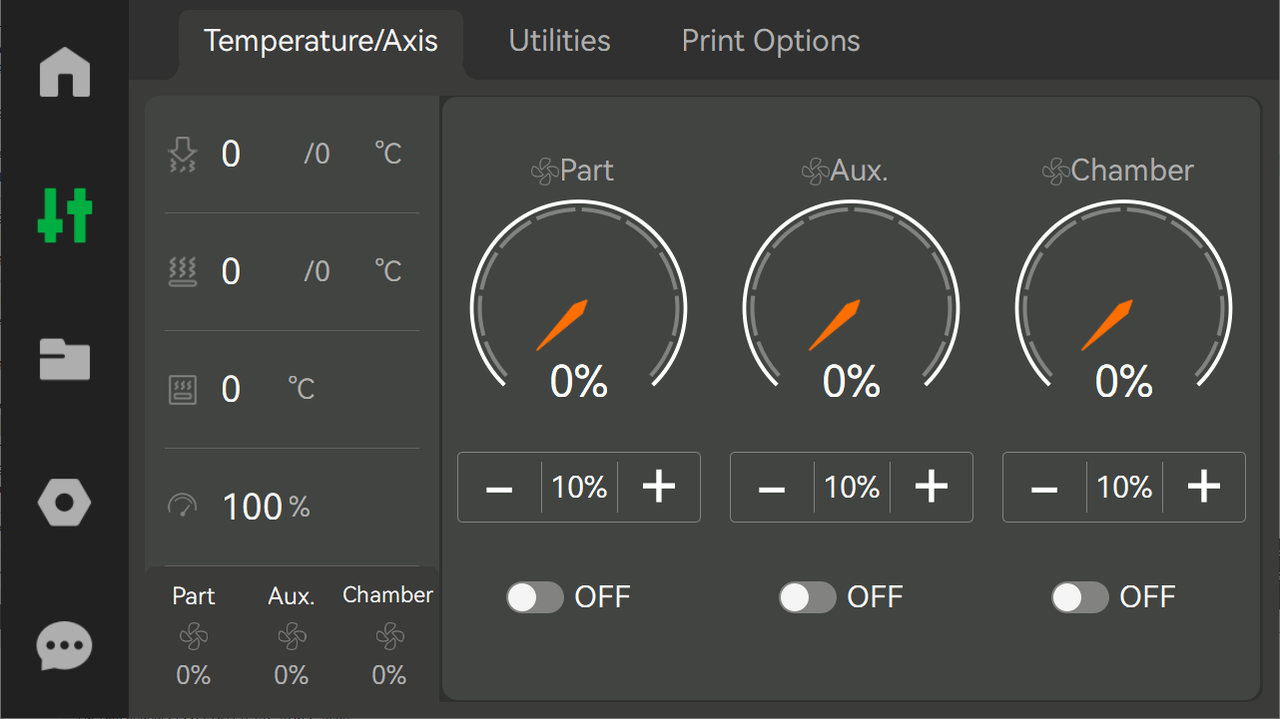
We have added Chamber Exhaust Fan controls on the screen of the printer. We recommend using that option if you wish to keep the fan speed lower so it is less noisy.

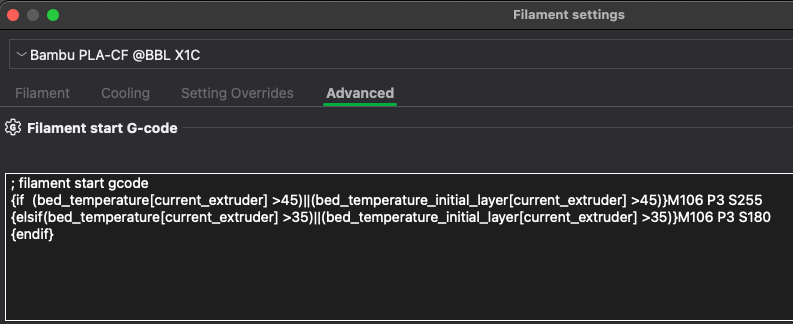
If you don't want to do it from the screen, you can also adjust the fan setting in the Filament Profile → Advanced section of the slicer to a lower amount. For example, setting the value from S255 to S128 will configure the Chamber fan to run only at 50% thus making it quieter. Just make sure not to use a value that is too low, as it will generate clogs when the chamber temperature is too high.

The other solution is to turn off the Exhaust Fan and just use keep the front door or top cover of the printer open when printing PLA and TPU.
¶ Capricorn Tubing / Smaller Internal Diameter Tubing
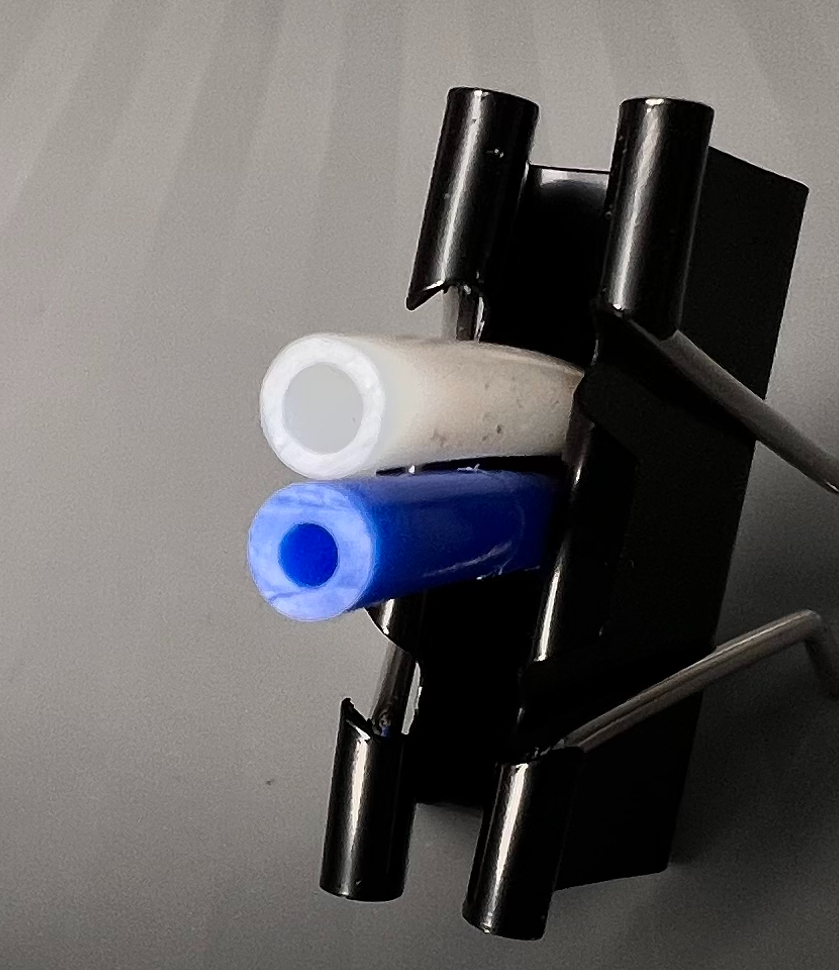
Capricorn PTFE tube is a popular mod for a lot of Bowden Style 3D printers mostly because it has a much tighter internal diameter to ensure better precision when the extruder is remote. Most of the Capricorn PTFE tube has a smaller Internal Diameter (under 2.5mm) which leads to extra drag.
The X1, P1P and AMS use a Reverse Bowden setup where the PTFE tube is used only as a way to direct the filament to the extruder.
Using a smaller internal diameter tube will only increase the drag of the filament until it reaches the extruder leading to other problems.

Replacing the PTFE tube on the AMS with Capricorn PTFE or similar can lead to loading/unloading issues and puts more strain on the internal motor of the AMS, and also on the feeders.
We do not recommend using this kind of PTFE tube with our products to avoid the issues mentioned above. The best option is to use our 2.5mm ID PTFE tube available in the shop which allows less drag on the filament, and it was tested to work as expected.
We also don't recommend using a higher ID PTFE tube, like the 3mm ID. It can also lead to failures during loading and unloading.
¶ Cardboard Spools in the AMS
We know that a lot of companies are using cardboard spools for their filament, and customers use that filament in the AMS. We recommend avoiding cardboard spools inside the AMS because of multiple reasons.
One reason is that some cardboard spools don't have a round shape, which prevents smooth turning inside the AMS creating extra force on the AMS Feeder mechanism and damaging it while also generating load/unload failures. Besides that, if the spool is not spinning right, the pull from the AMS Feeder generates extra pressure on the front roller of the AMS which can bend it and lead to other issues over time.
Another reason why cardboard spools might not work is the cardboard dust generated. The spools are turning multiple times inside the AMS, and the edges of the cardboard spool can start to disintegrate and generate small particles of cardboard dust which gets inside the AMS feeder gears, and the front roller. As you might expect, this also generates failures over time.
We strongly recommend using filament with plastic spools that fit correctly inside the AMS, as it was designed to allow specific-size spools for best results, or to re-spool the filament on plastic spools.
If you still want to use filament with cardboard spools, we strongly recommend using 3D-printed ring covers for the spools to help the spool turn easier and shed less dust.
Make sure that there are no burrs on the rings. If there are sharp corners on the ring, they will cut into the rubber covering the front roller which leads to damage and failures.
Ensure that the top cover of the AMS does not apply force over the spool plastic adapter, and the spool fits inside with the adapters installed.
If you are using Polymaker filament, they have provided dedicated Spool Adapters for their cardboard spools which should solve the problem.
We also found Ring Adapters made for other manufacturers like FormFutura, Eryone, and others.
¶ P1P Complete Enclosure with no fan
When the P1P was designed, it was not made with high-temperature printing in mind. To be specific, it was never designed to be enclosed with an air-tight enclosure. All the mod enclosures we provide are not enclosing the printer fully to allow it to function as expected.
When the printer is fully enclosed, the MC Board can get hotter than expected, leading to failures and skipped steps. The P1P can work as expected with passive cooling on the MC Board, as long as the printer is not fully enclosed. There are multiple holes around the MC board where air can escape and natural convection can help keep the electronics cool.
To avoid this issue, we strongly recommend installing an MC Fan on the back of the printer, next to the MC Board. This fan will blow air over the heatsink of the P1P and keep it cool during operation, especially when it's fully enclosed and the temperature inside the chamber is high.
Please make sure to read this article before enclosing your printer: Precautions for P1P enclosure
¶ P1P Cable Chain with no cable upgrade
On the same topic of enclosures, the P1P was not designed from the beginning to use a cable chain. This is a popular mod where the PTFE tube and the print head cable are routed with a cable chain to keep things a bit more organized.
The cable chain can generate issues with the stock P1P cable and because of that, we do not recommend performing this upgrade without also upgrading the tool head cable.
The upgraded cable is more suited for this upgrade, and doing this will help avoid issues during use.
¶ AMS mods to pull 24V
We have seen our customers creating different mods that connect to the 24V power available on the AMS connectors. The connectors and the power available on the AMS are made to allow daisy-chaining up to 4 AMS units with cables between them.
Adding various mods that connect directly to the AMS power can lead to damage to the AMS board. The issues could be related to shorts, or pulling more power from the pins than expected.
We strongly avoid doing these mods, and instead, we recommend using external power methods for LED mods or other applications that need power to be implemented.
¶ AMS Hydra Mod
There is no denying that the AMS Hydra Mod is awesome. We love it.
But at the same time, we have seen an increase in issues with the AMS for the units that were using it, and the AMS Hydra Mod was not installed correctly.
First, it's important to note that doing the AMS Hydra Mod is a more complex operation that requires some degree of understanding of how the AMS works, and also a bit of skill to completely replace the AMS frame with the Hydra frame. When the upgrade process is done, mistakes can be done where wires can get damaged, the RFID plates can be damaged, or the cable connections, routing, and PTFE tubes are not installed as expected.
Of course, with careful disassembly, the mod can be successfully installed, but we strongly recommend doing this mod only after reading the guidance available for it, and being gentle when doing it.
Another consideration for the Hydra mod is when using larger spools inside the AMS. The main reason why the AMS Hydra Mod exists is to allow other types of spools to be used inside the AMS. But in some cases, if the spools do not fit the AMS right. If the spools are heavier than expected, using them inside a modded AMS can lead to damage and failures.
An example is with the AMS feeders and the front rollers. A bigger spool will generate a higher pressure against the front roller and the AMS feeder motor will work harder to pull the filament inside the AMS.
This can lead to premature wear on the feeder and front roller, so please observe if this issue occurs when using the AMS Hydra Mod.
We will not invalidate the warranty for this mod, but please inform our Customer Support team if you are using such a mod as the suggestions for troubleshooting can be different. Besides that, we will recommend you returning the AMS to the stock configuration during troubleshooting, in order to verify if the problems reported are generated by the Hydra Mod or other components.
If we consider that the damage was generated by the mod, we will not be able to provide replacement parts under warranty.
¶ 3rd party hotends with taller nozzle
Some customers decide to install aftermarket hotends in the X1/P1P. Most of the time, these nozzles are slightly taller compared to our original Bambu Lab Nozzles and this can lead to damage to the nozzle wiping mechanism. Besides that, the extra force that goes over the nozzle when such a mod is used can lead to other issues like breaking the heartbreak, failure to correctly wipe the nozzle, or layer shifts.
We strongly recommend avoiding such nozzles if they don't have the same shape and size as our original nozzle, to ensure there is no damage done to the printer.
¶ Hotends with High Power Heaters
The TH board for the X1 and P1 series is designed to supply power to the hotend heater up to 48W. If a higher wattage heater for the hotend is used, or an aftermaket hotend which draws more power is used, damage can occur to the AP Board, Type-C cable and TH board.
We strongly recommend avoiding a higher wattage heater as it can lead to damage which is not covered by warranty.
¶ LED lights connected to the AP board
The AP board of the X1 and P1 series is designed to supply up to 0.3A of power to the LED bar used for iluminating the enclosure. If the printer is upgraded with a more powerful LED light which generates a higher power draw, the AP board can be damaged.
We strongly recommend avoiding a higher power LED light as it can lead to damage to the AP board which is not covered by warranty.
For dedicated lighting, we recommend using the 6500K White LED Light Strip with external power or connecting it to the P1 USB port.
¶ Spoofing other plates with a code sticker
There are many popular aftermarket plates available for the Bambu Lab printers. Some of them include a printed code in the box which can be placed on the plate to allow the printer to scan it and detect the plate.
We strongly recommend against spoofing the plate type with a code if it's not the same as an original plate. The Bambu Studio slicer has different settings configured which tell the printer the type of plate used and if the code is not the one expected, the printer can fail.
For example, we have noticed codes similar to the one used on the Cool Plate / Engineering Plate used with textured plates to allow the first layer scanning and flow calibration. But when these codes are used with a Textured plate, the aforementioned features will not work as expected and the print quality can suffer in some situations.
To avoid any problem when using aftermarket plates, we recommend disabling the plate detection feature and making sure the right type of plate is selected in Studio (or a plate that is similar to the one used in the printer).
Please note that we are unable to offer replacements for damaged 3rd party plates in case of a failure. And if the issue is generated by the use of a 3rd party plate, we will not be able to replace other parts of the printer under warranty.
¶ TPU Filament in AMS
TPU filament is not compatible with the AMS, and we strongly recommend avoiding it. Of course, if you need to print TPU, you can do it, but it needs to be fed from the external spool holder.
One of the main reasons why AMS is not compatible with TPU is the flexible nature of the material. The AMS has intricate filament paths, and the AMS feeders apply some pressure on the filament. TPU filament will deform in the feeders, and can easily clog the AMS so please avoid this as it can be time-consuming to unclog the system, and damage can occur.
When contacting Customer Support for help, please make sure to mention if you are using a specific mod done to your printer. We assure you that this request is not done to avoid providing you with Warranty support, but it for us to be aware of the mods and to take them into account when offering help.
Knowing about these mods can help us provide you with better recommendations and ideas on how to troubleshoot the issue and to find a solution that solves the problem.