¶ When to Use
This document mainly explains the troubleshooting steps for A1 printer malfunctions, including those of the mainboard (MC), toolhead mainboard (TH), stepper motor, etc.
The main phenomena are:
- The power indicator light of the printer is normal, but the screen is off;
- All indicator lights are off after the power is turned on;
¶ Precautions for Troubleshooting
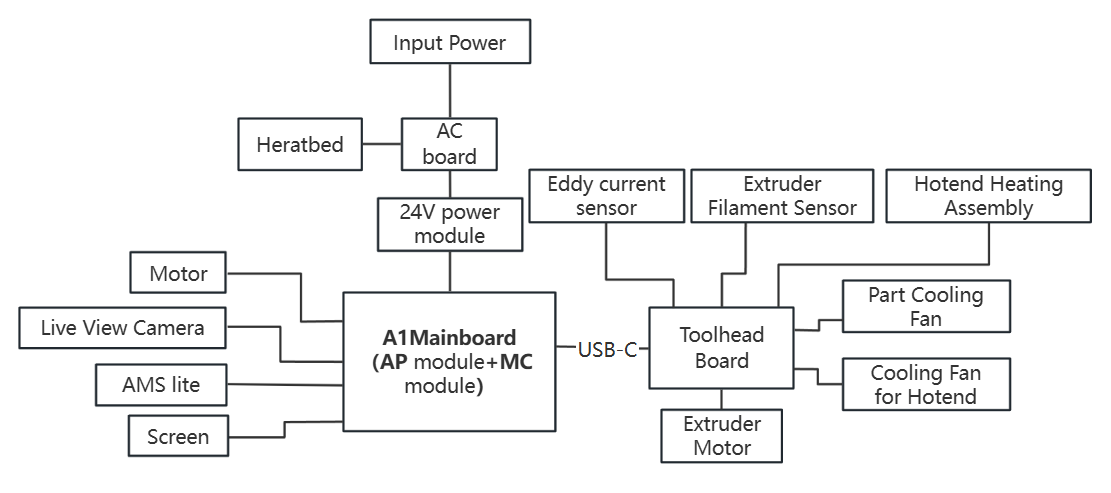
Before starting the formal troubleshooting, it is first necessary to understand the status of the mainboard, toolhead, and HMS light language.
¶ Normal Status: TH Board indicator light constantly green
https://public-cdn.bblmw.com/wiki/video/A1M-TH.mp4
¶ Normal Status: MC Board green light blinks every 5 seconds
https://public-cdn.bblmw.com/wiki/video/A1-MC.mp4
¶ Normal Status: AP Board has one green light blinking once per second (MC Board and AP Board integrated on the mainboard)
https://public-cdn.bblmw.com/wiki/video/A1-AP.mp4
¶ Normal Status: HMS indicator light on
When there is an HMS error, it blinks quickly to prompt the user to check the HMS error information. When there is no HMS information, if the screen is on, this indicator light is constantly on. If the screen is not on, this light blinks slowly.
https://public-cdn.bblmw.com/wiki/video/A1-Screen-idle.mp4
¶ Safety Tips
Important Reminder!
This troubleshooting guide involves many connector plug - ins and pull - outs. Before performing any maintenance or connector plug - in and pull - out work on the printer and its electronic devices (including toolhead cables), please turn off the printer power and disconnect the power supply to avoid short - circuiting due to live operation, which may cause additional electronic device damage and safety hazards.
When you perform maintenance or troubleshooting on the printer, please first confirm the temperature of the hotend and the heatbed to avoid operating at high temperatures. If it is necessary to operate at high temperatures, please wear heat - resistant gloves to ensure safe and effective maintenance work.
If you have any concerns or questions about following this guide, open a new ticket in our Support Page and we will do our best to respond promptly and provide you with the assistance you need.
¶ Required Tools
- H2.0 Allen key
- H1.5 Allen key
- PH2 Philips screwdriver
- Tweezers
- Multimeter (not required)
¶ 1. Power Indicator Light Is Normal, but the Screen Is Off
¶ Problem Phenomenon
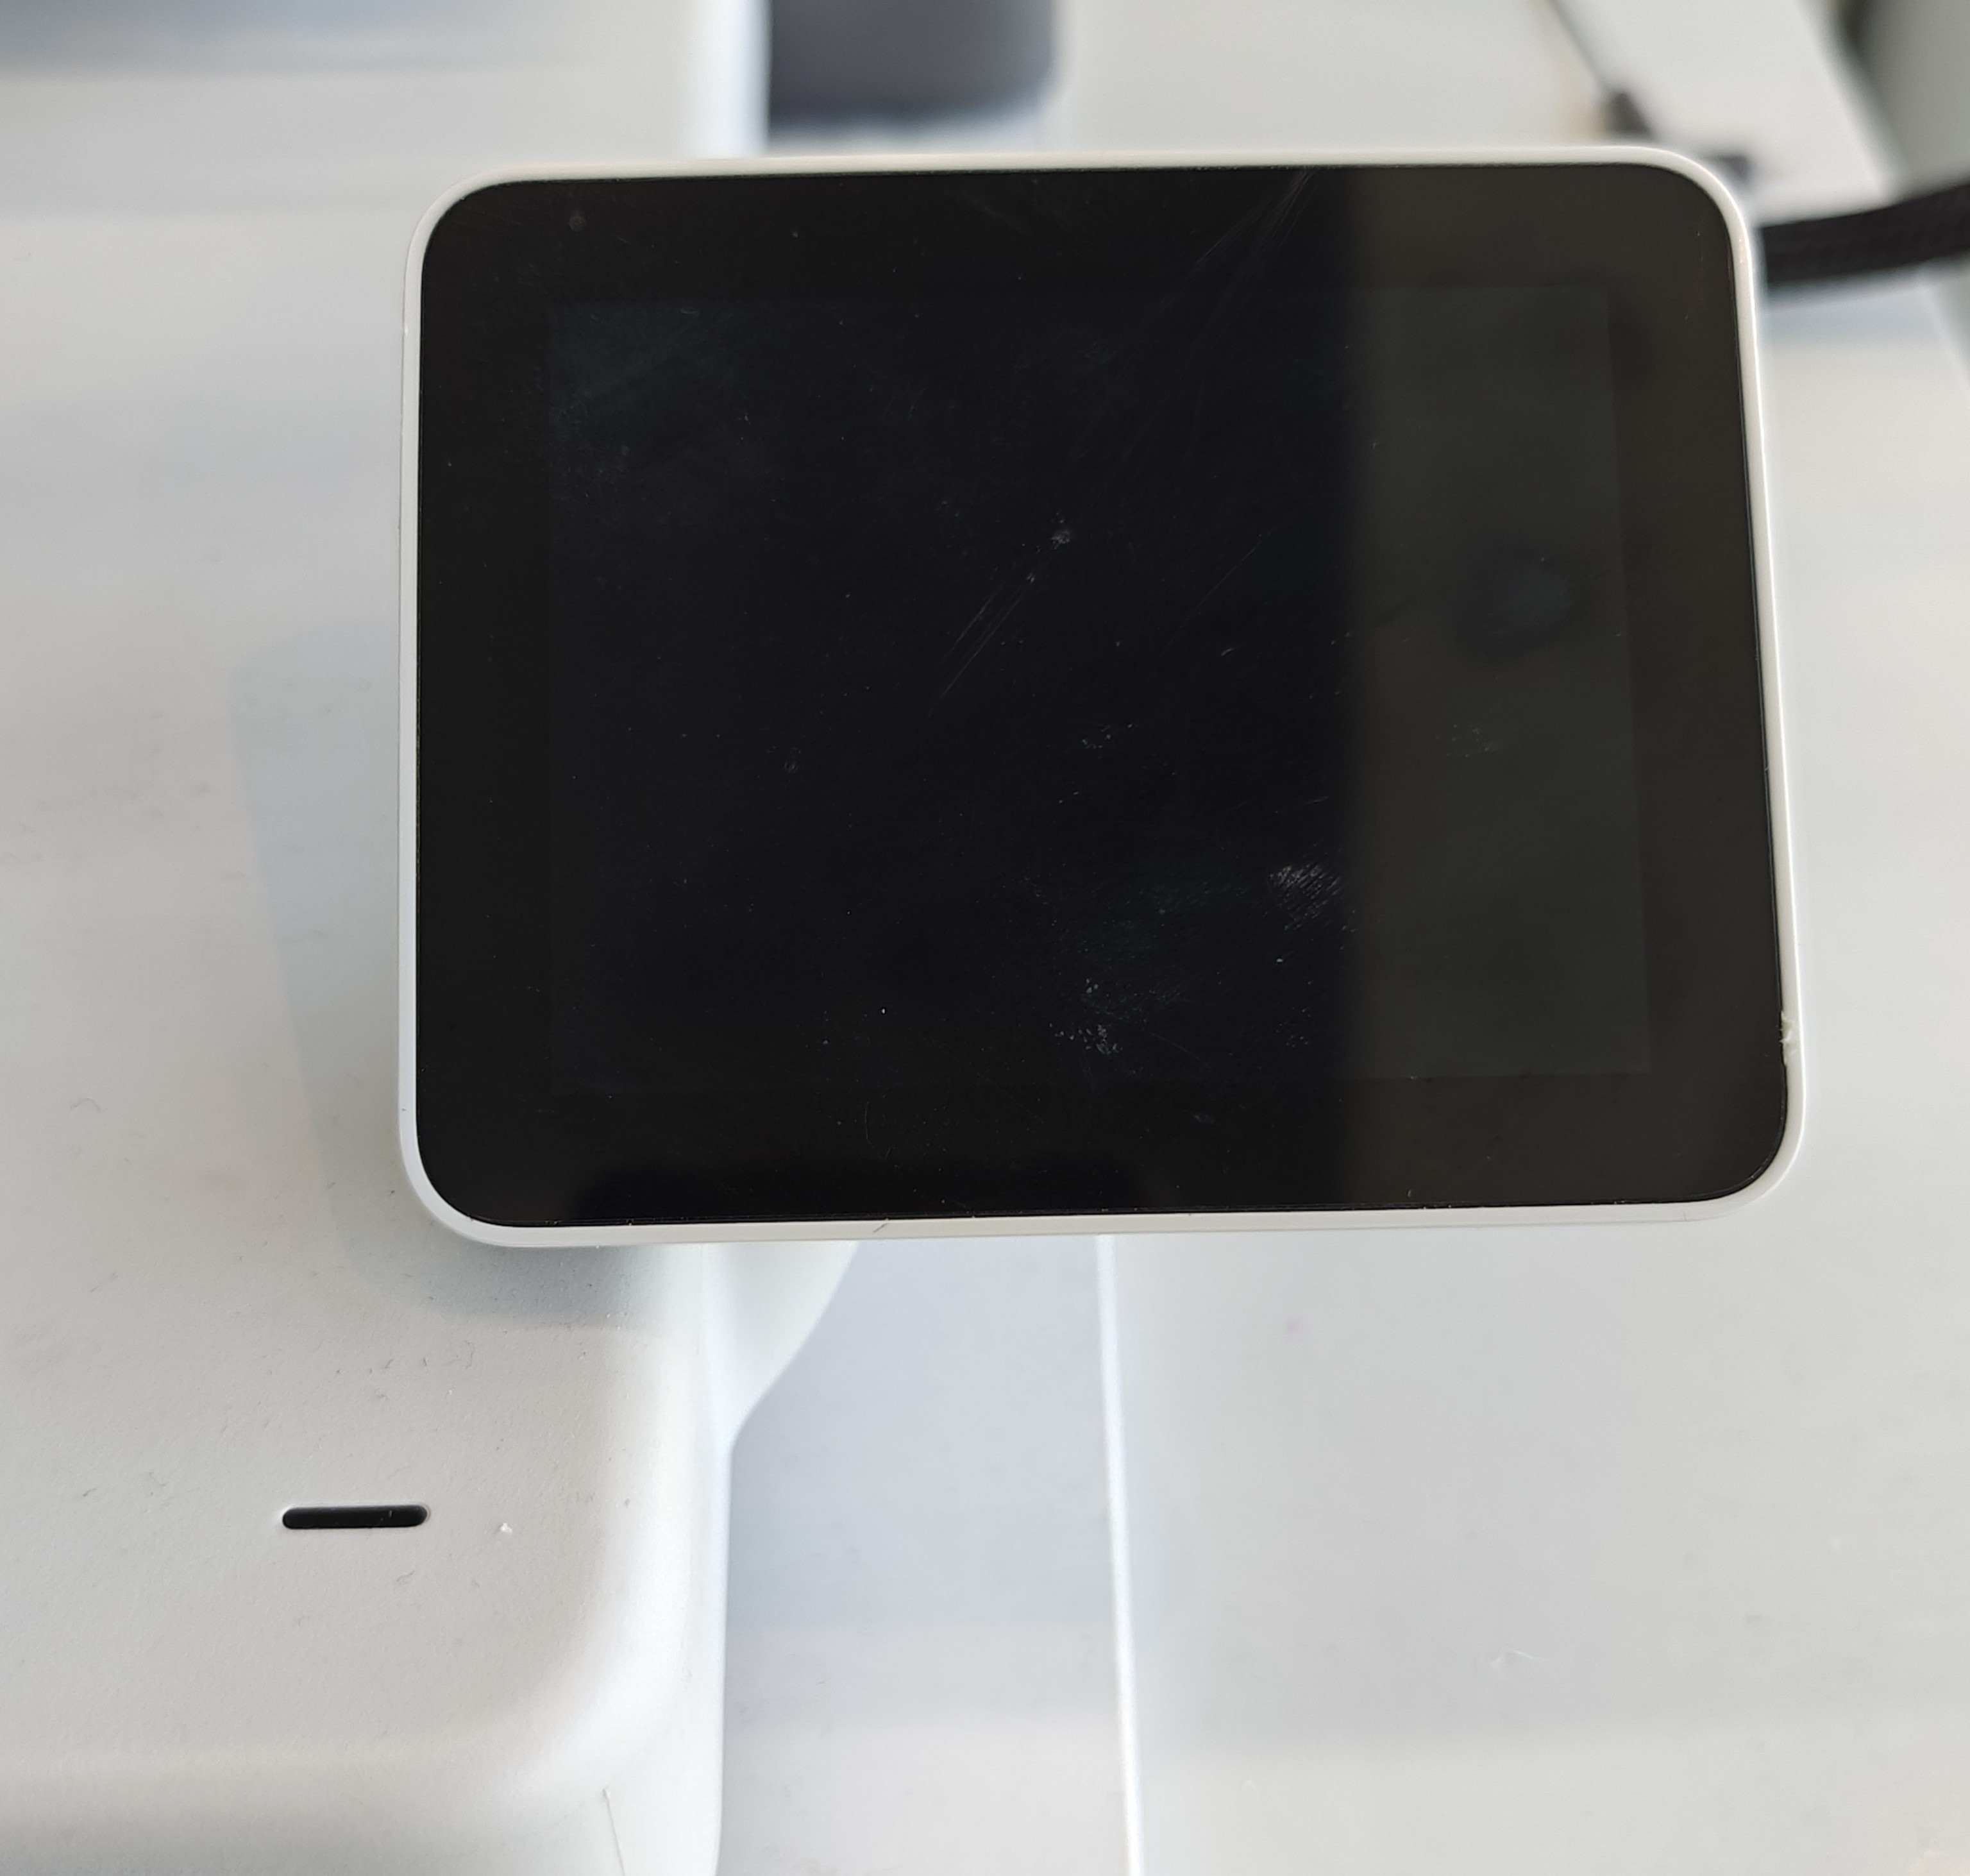
After connecting the power cord and turning on the power, although the power indicator light on the back is on, the printer's screen is not lit.
|
|
¶ Troubleshooting Suggestions
The principle behind the troubleshooting suggestions is that if the indicator lights of the remaining circuit return to normal after disconnecting a specific connector, it indicates that the module connected to that interface is the cause of the abnormality. In this case, further troubleshooting or replacement of the faulty module is required.
Note: Before each plug - in and pull - out action, you must first turn off the printer power. After the plug - in and pull - out are completed, turn on the printer power again and observe the circuit status.
.png)
¶ Possible Causes of Failure and Solutions
¶ 1. Screen Failure
Observe that if the mainboard AP\MC, toolhead mainboard, and HMS light language are normal, it can be judged as a screen failure or an abnormal connection cable.
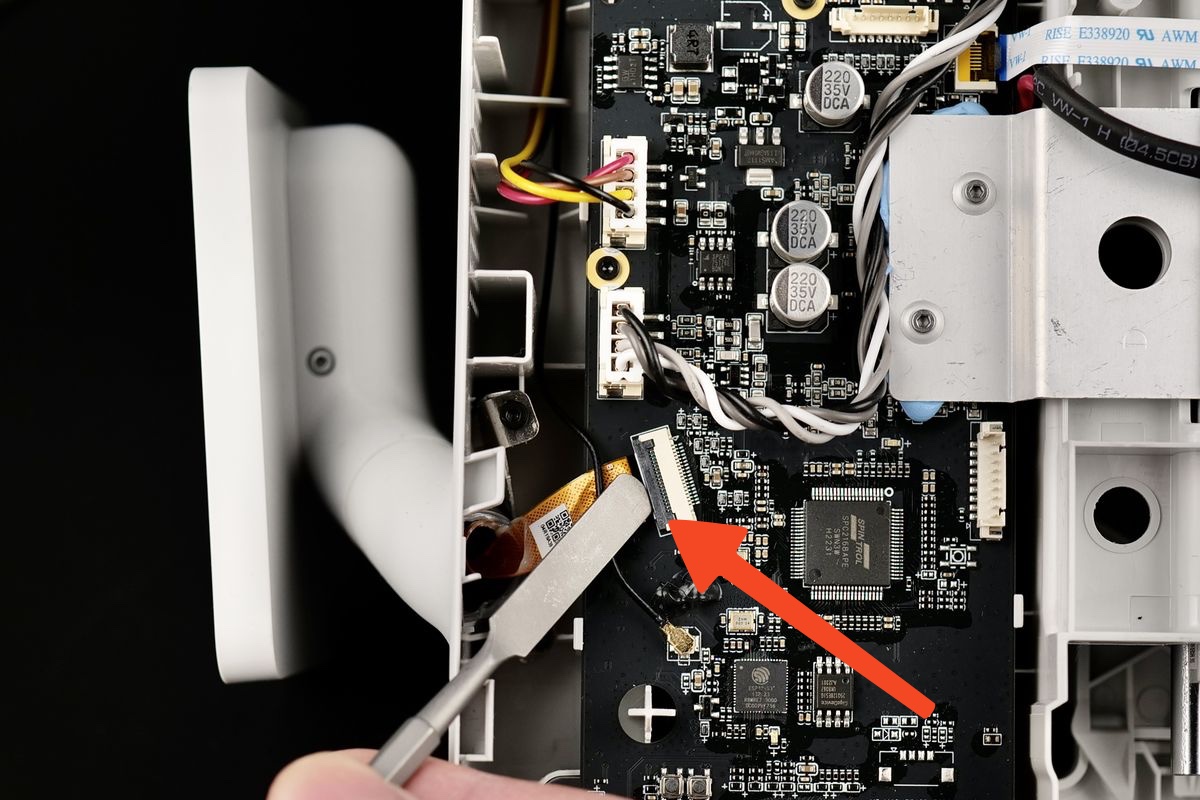
- Remove and reinsert the screen cable to check whether the cable is damaged.
Carefully lift the black plastic clip on the mainboard, loosen the ribbon cable of the screen, remove it from the mainboard and re-insert it into the slot and press the black plastic clip firmly; turn on the power again to check whether the screen lights up normally. - If the screen is still abnormal, the screen component needs to be replaced.
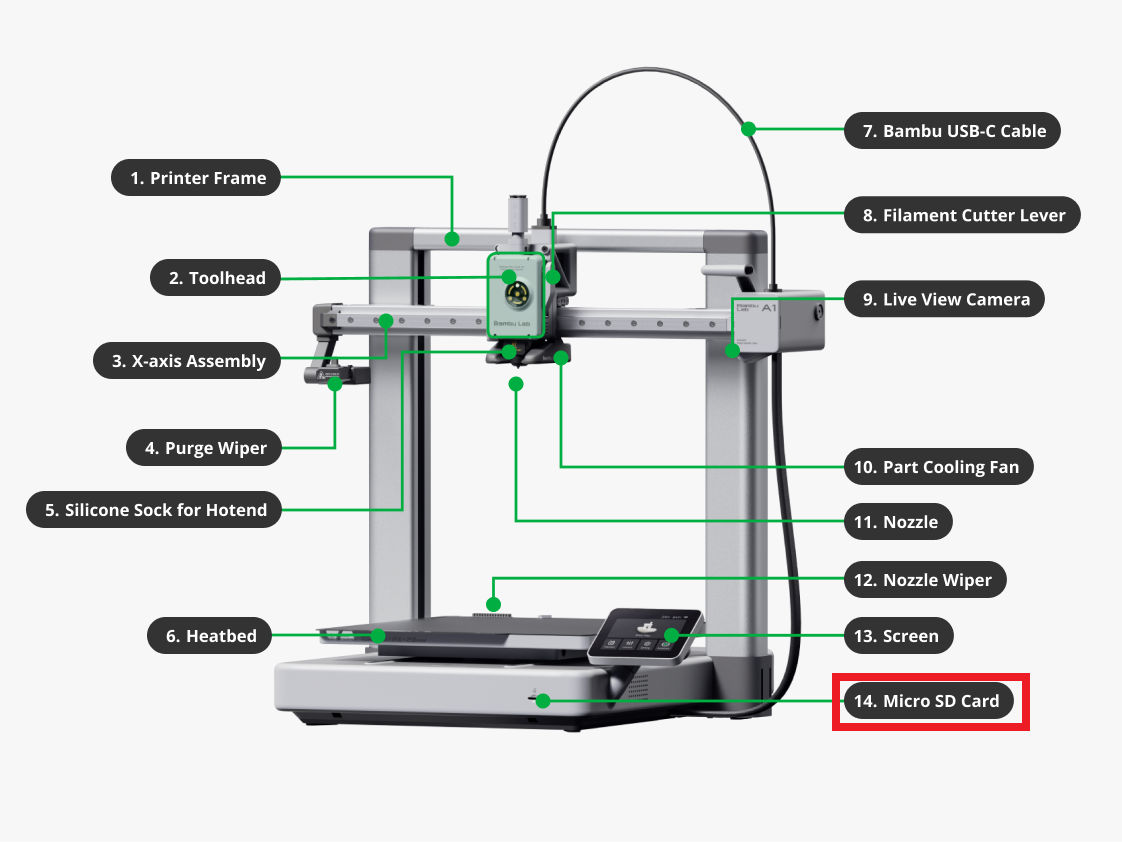
¶ 2. MicroSD Card Failure
A short - circuited MicroSD card may cause the AP fault indicator light not to be on and the screen to go black.
- Turn off the printer power and remove the MicroSD card.
- Restart the printer and observe whether the screen can light up normally. If the screen can be displayed normally after removing the MicroSD card, please re - insert the MicroSD card into the printer in the off - state and restart it again to verify whether the previous black - screen problem was caused by a MicroSD card failure.
¶ 3. Abnormal Output of 24V Power Module.
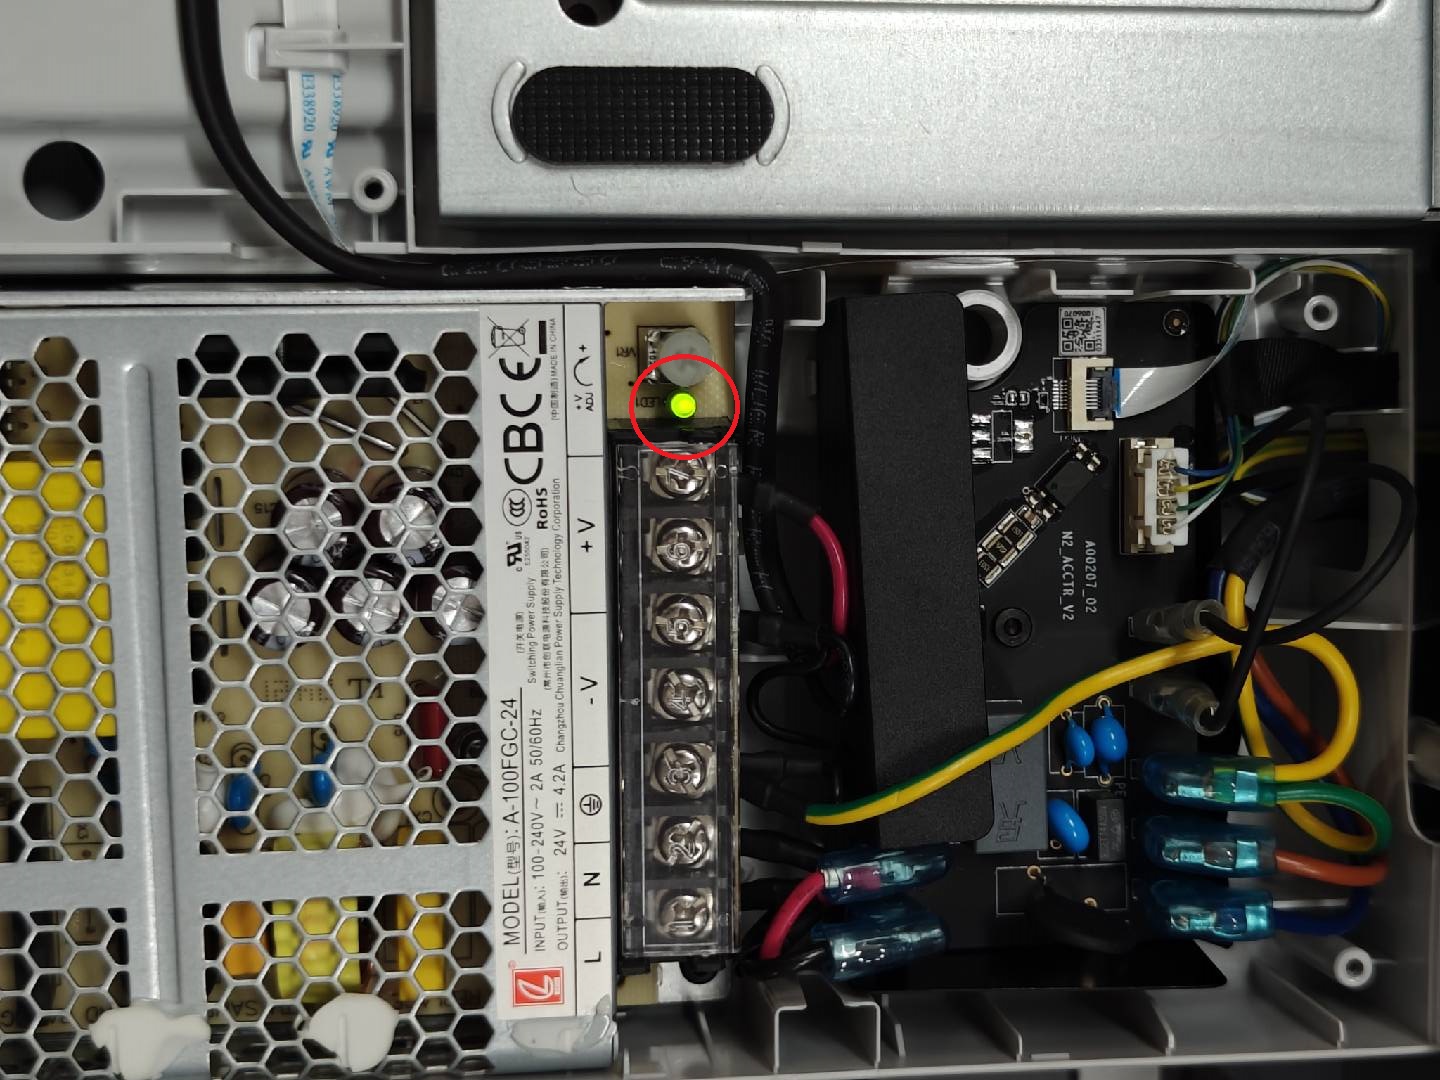
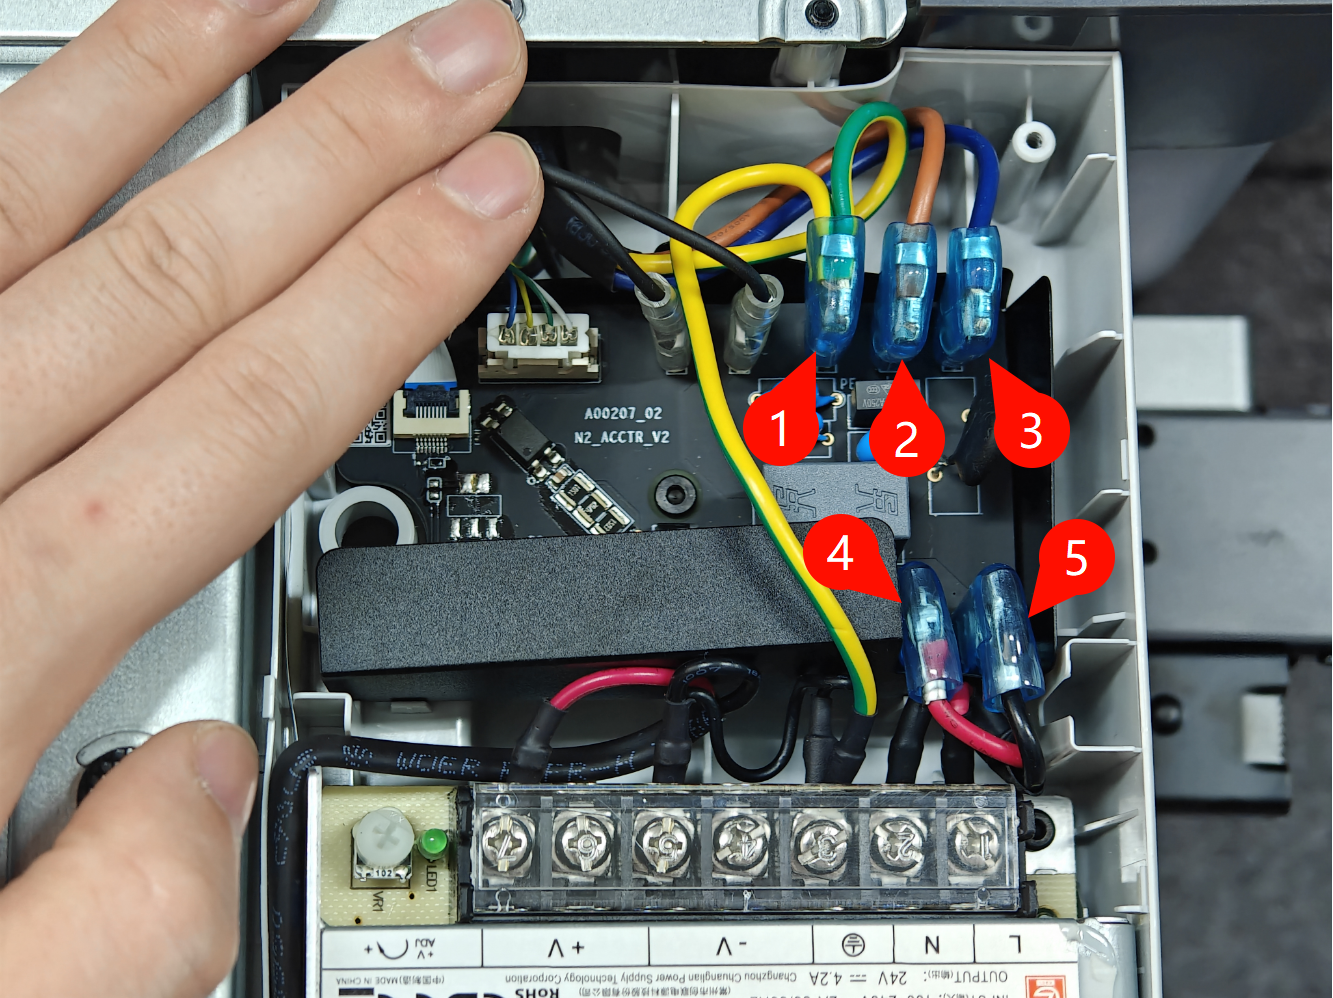
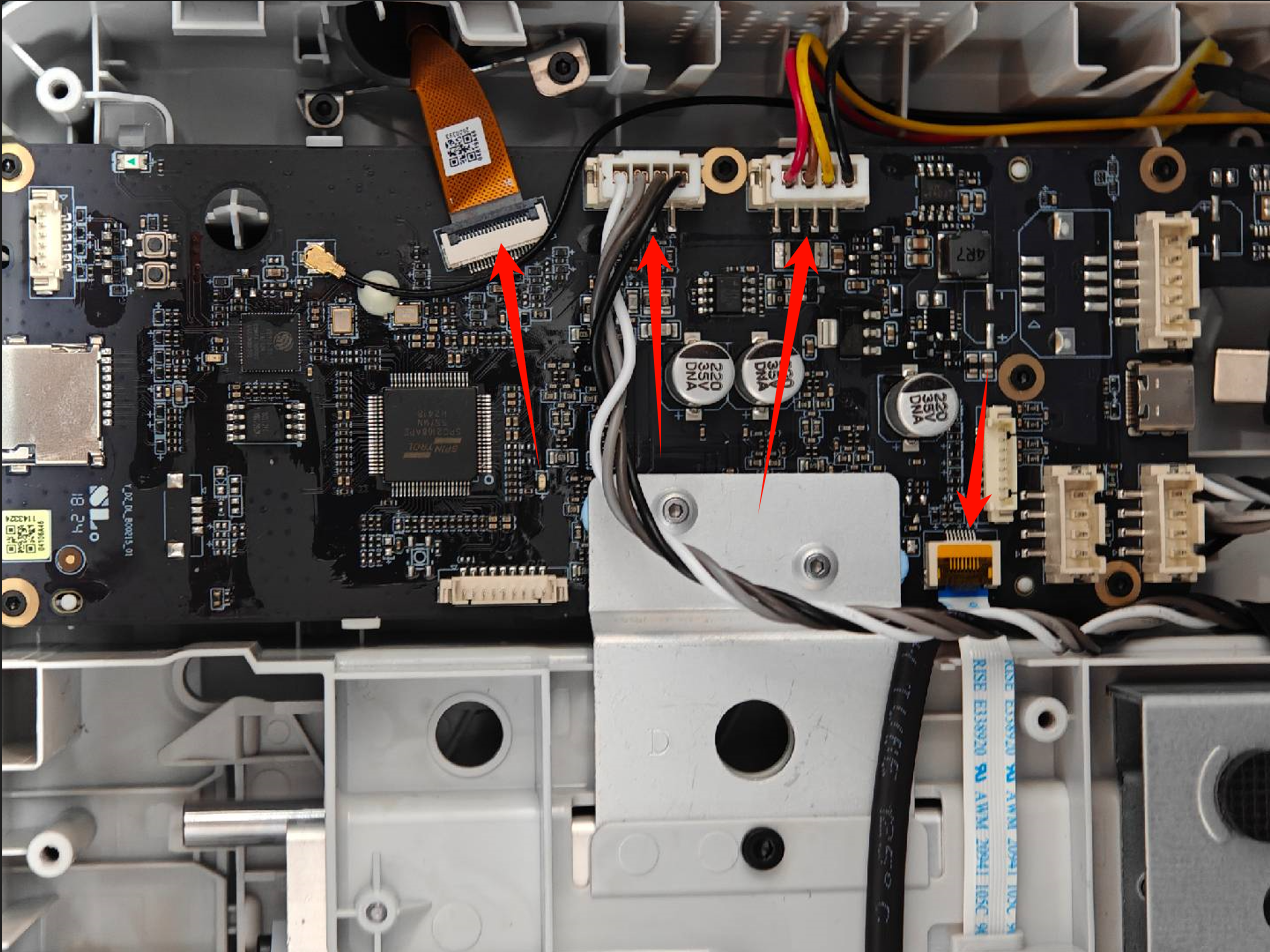
Check whether the indicator light of the 24V power module and the plug - in status of terminals #1 #2 #3 #4 #5 are normal. The normal state is that the green light is constantly on.
The input voltage of the printer mainboard is 24V, which is provided by the 24V power module. If the output of the power module is abnormal, it will cause the input voltage of the mainboard to be abnormal, thus causing all indicator lights not to be on; then the power module needs to be replaced.
 |
 |
-
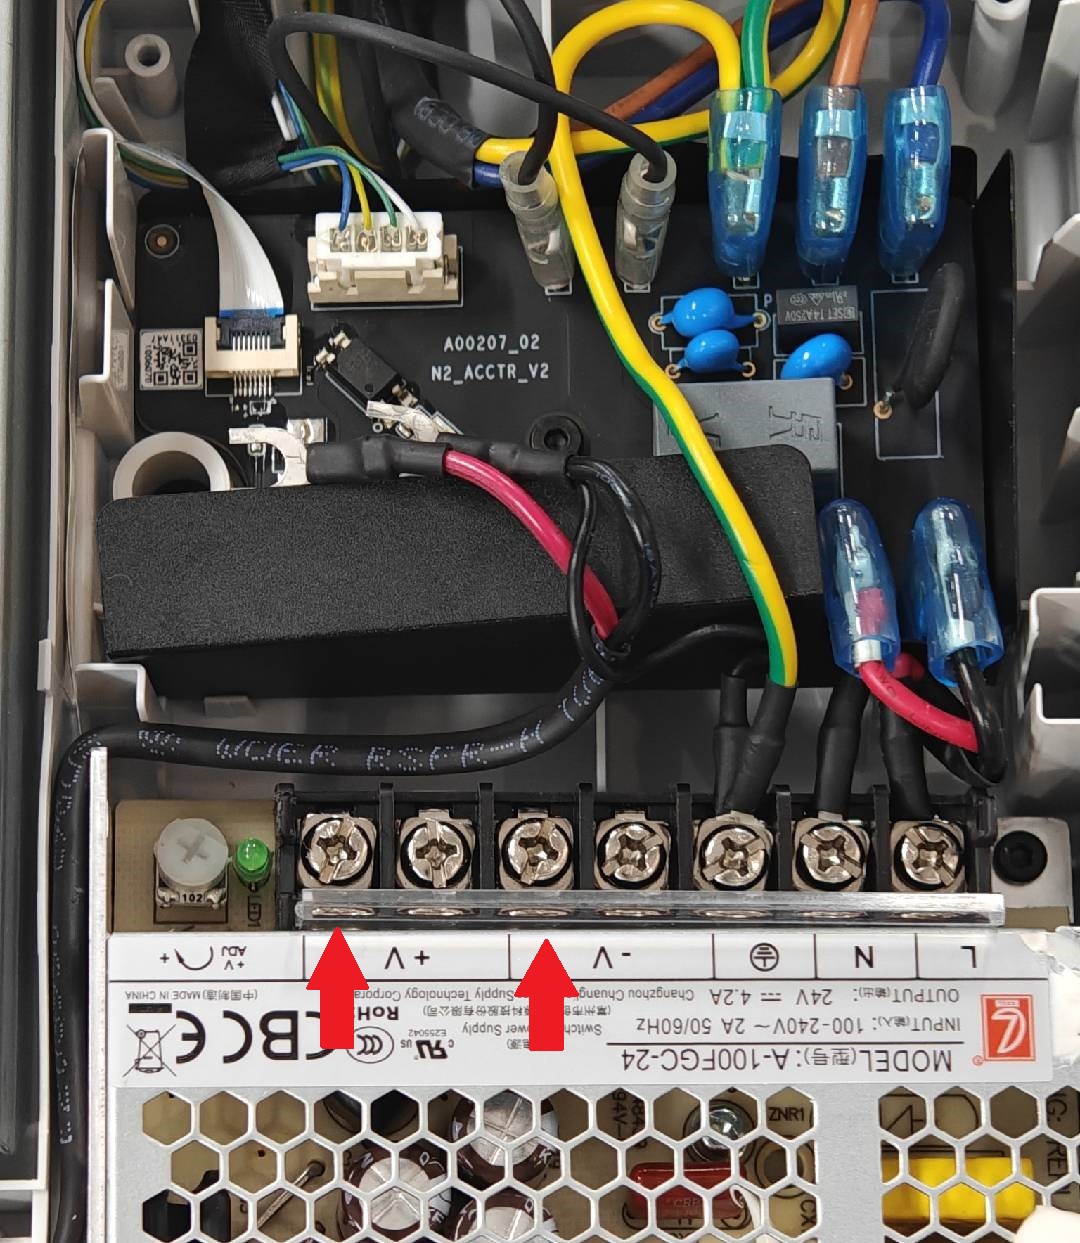
You can try loosening screws #1 and #2 in the figure below to remove the mainboard power cable. At this time, the power module has no external interference.Turn on the power supply of the connector. If the indicator light is still abnormal, it can be judged that the power module is faulty.
-
After removing the mainboard power cable, if the power indicator light returns to normal and there is a 24V power output, it may be that the mainboard or some circuit boards behind it are short - circuited, so further troubleshooting is required.
 |
 |
¶ 4. Other Circuit Boards Are Abnormal When the Output of 24V Power Module Is Normal.
The 24V power supply of the circuit boards inside the printer is connected in series. If any short - circuit occurs in any circuit board (such as the mainboard or toolhead mainboard) or any components (such as fans, heaters, motors on the circuit boards) on the main circuit or branch circuits, the entire 24V system may short - circuit.
If it is confirmed that the power module works normally, the problem must be one of the circuit boards (most likely the mainboard or toolhead mainboard), or some components (less likely fans, heaters, motors) on these circuit boards have a 24V short - circuit, causing the entire system to short - circuit. Therefore, further troubleshooting is required.

- After removing the bottom shell, with the TH board, X motor, Z motor, and camera component ribbon cables already removed, you can turn on the power switch to test whether the mainboard light language lights up normally. If it still does not light up normally, you can further remove the Y - axis motor, AMS lite, AC board, and screen ribbon cables and then turn on the power switch again.
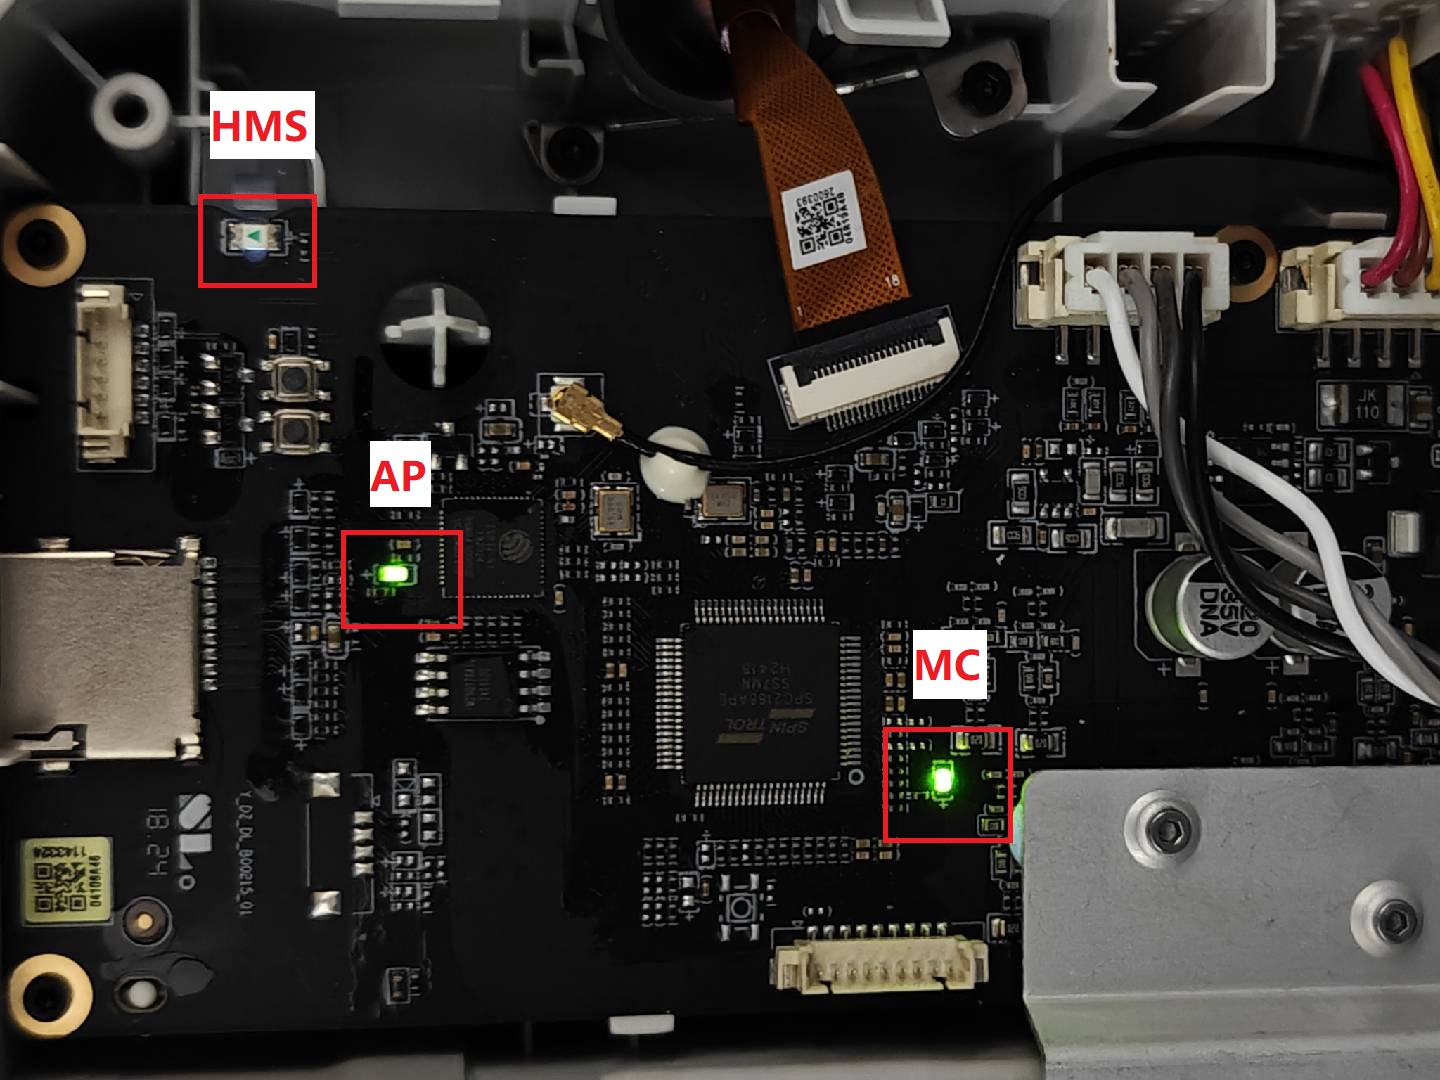
If the mainboard is normal, after turning on the printer, the three indicator lights on the mainboard will light up normally.
- HMS (white),HMS indicator light blinks slowly on the other side of the mainboard.
- AP (green),AP indicator light blinks once every second.
- MC (green),MC indicator light blinks once every five seconds.
 |
 |
- Then connect other cables in turn. If the mainboard light language goes out when a certain cable is inserted, you can troubleshoot along this link and replace relevant accessories;
- If the mainboard light language still fails to light up normally after all the mainboard cables are removed, it can be judged as a mainboard abnormality.
¶ 2.All Indicator Lights Are Off after Power-on
¶ Problem Phenomenon
After the power is turned on and the switch behind the printer is opened, all indicator lights are off.
 |
|
¶ Possible Causes of Failure and Solutions
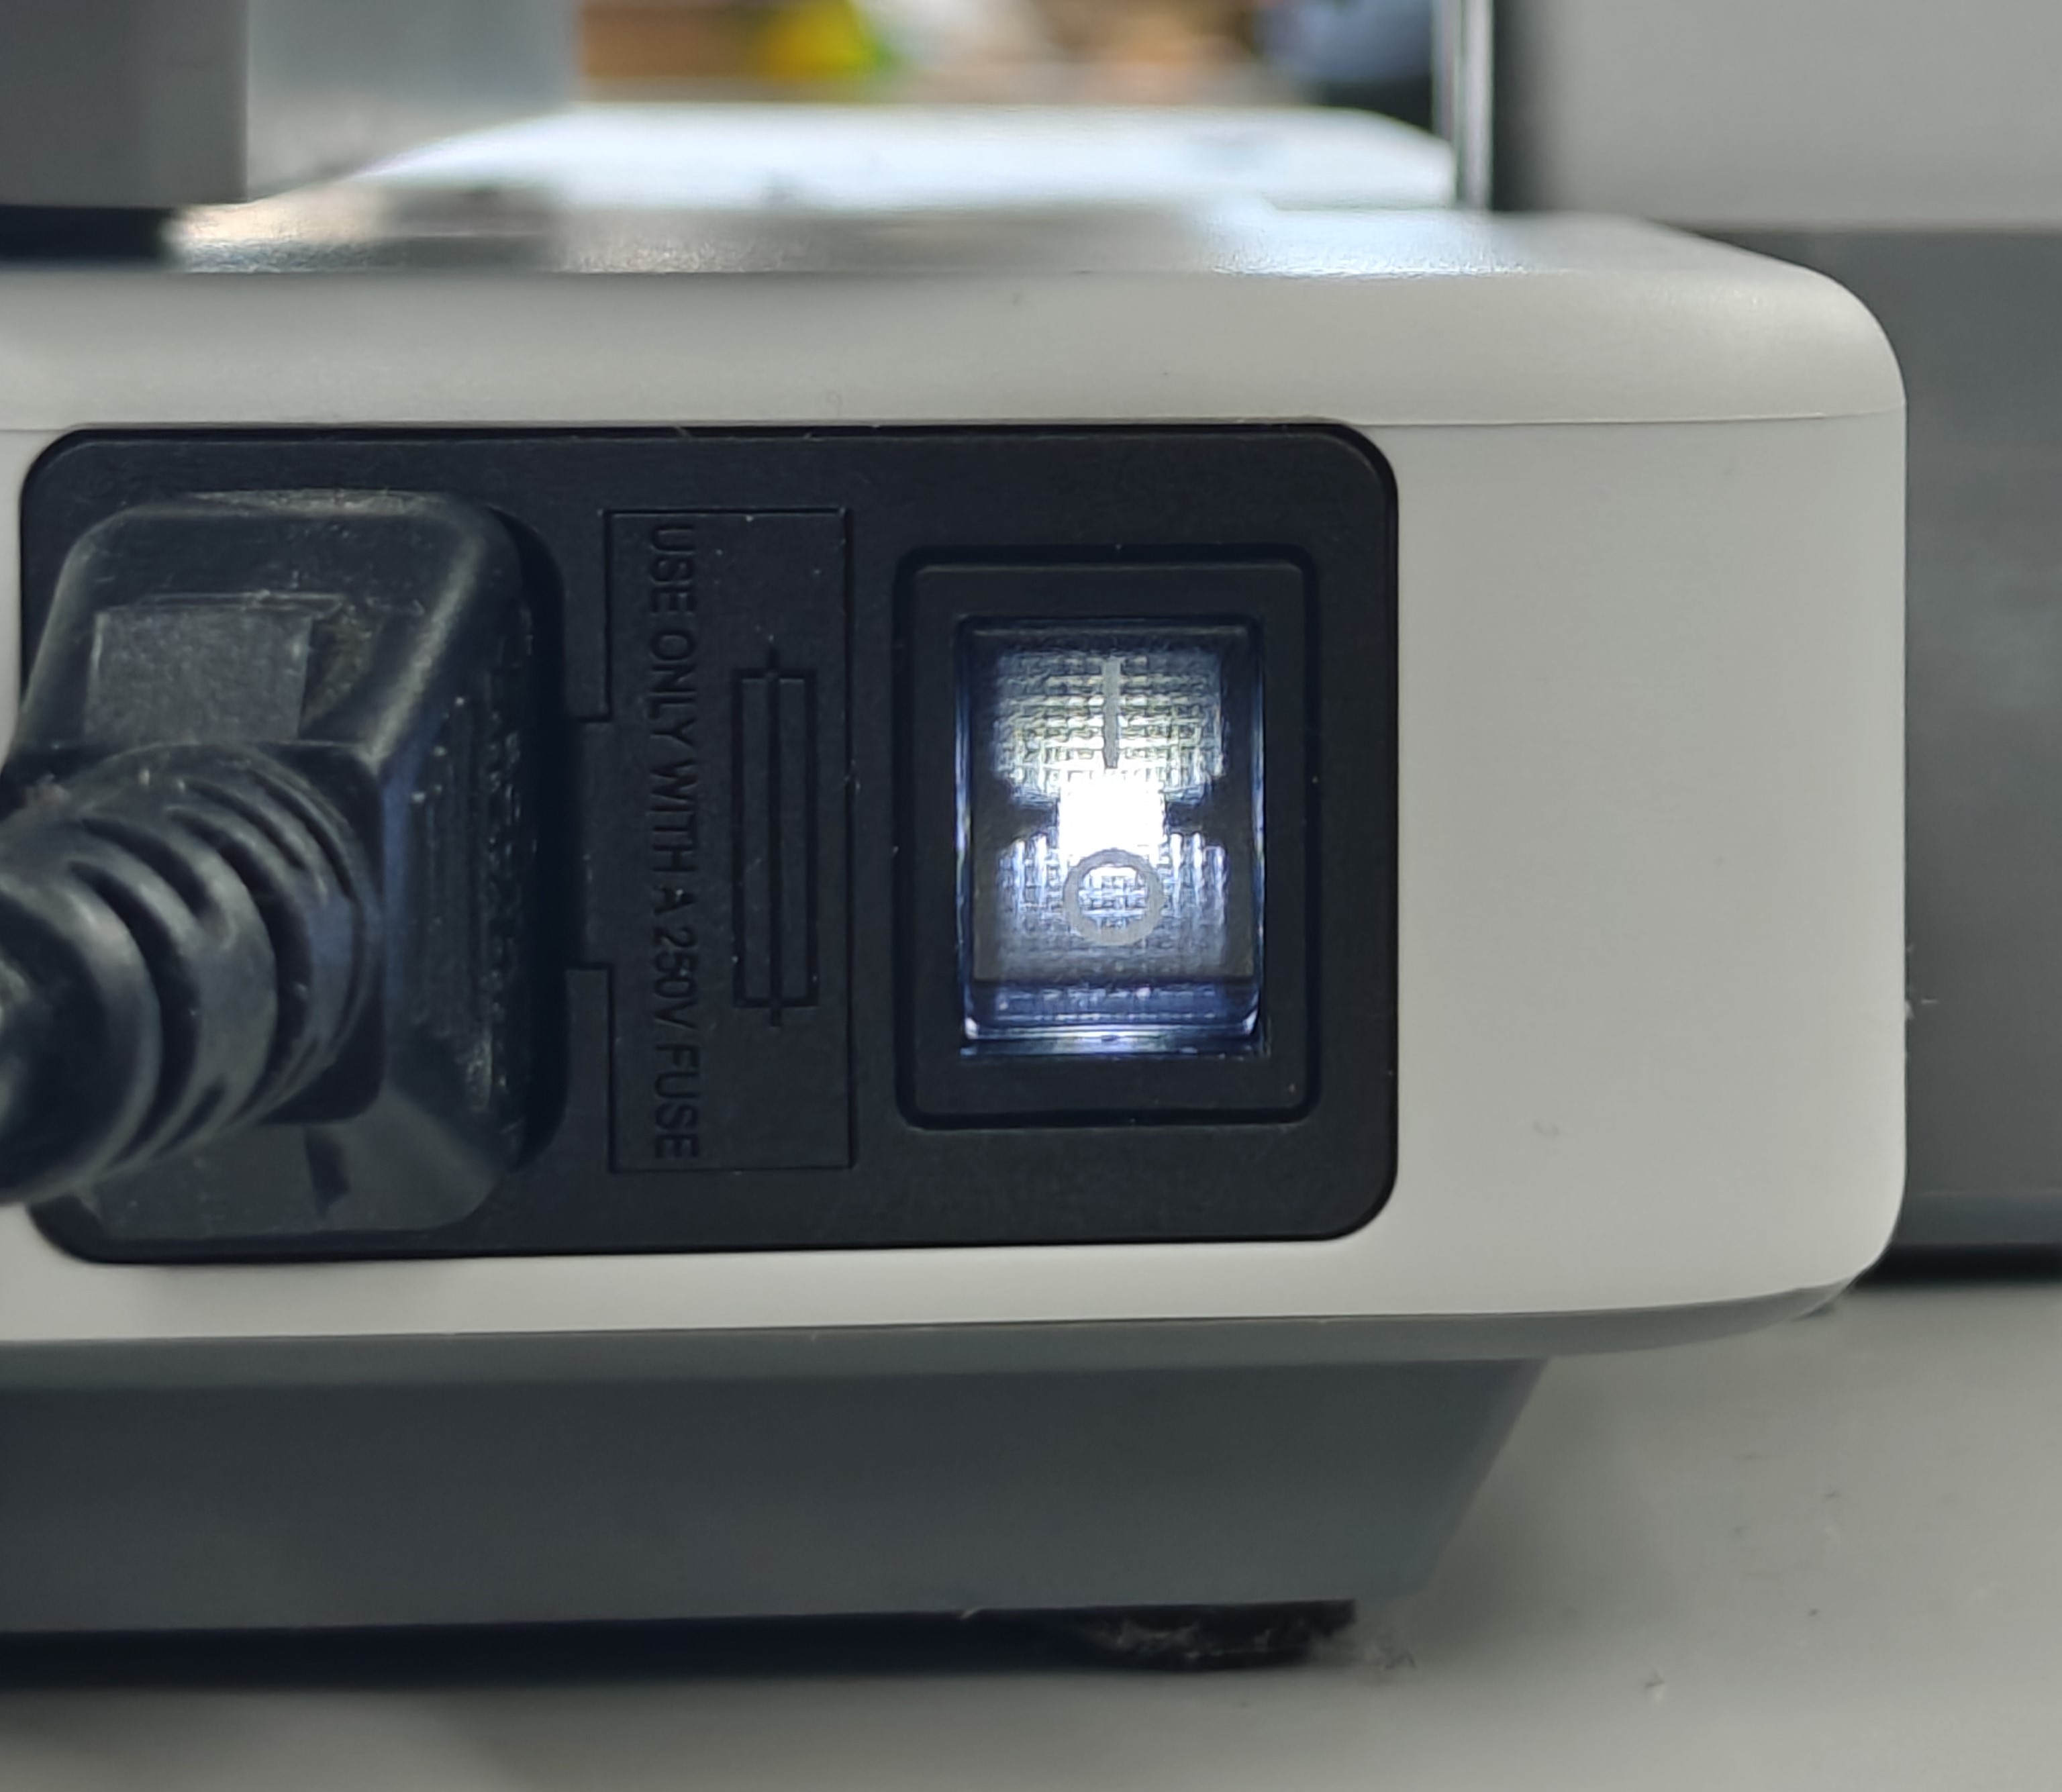
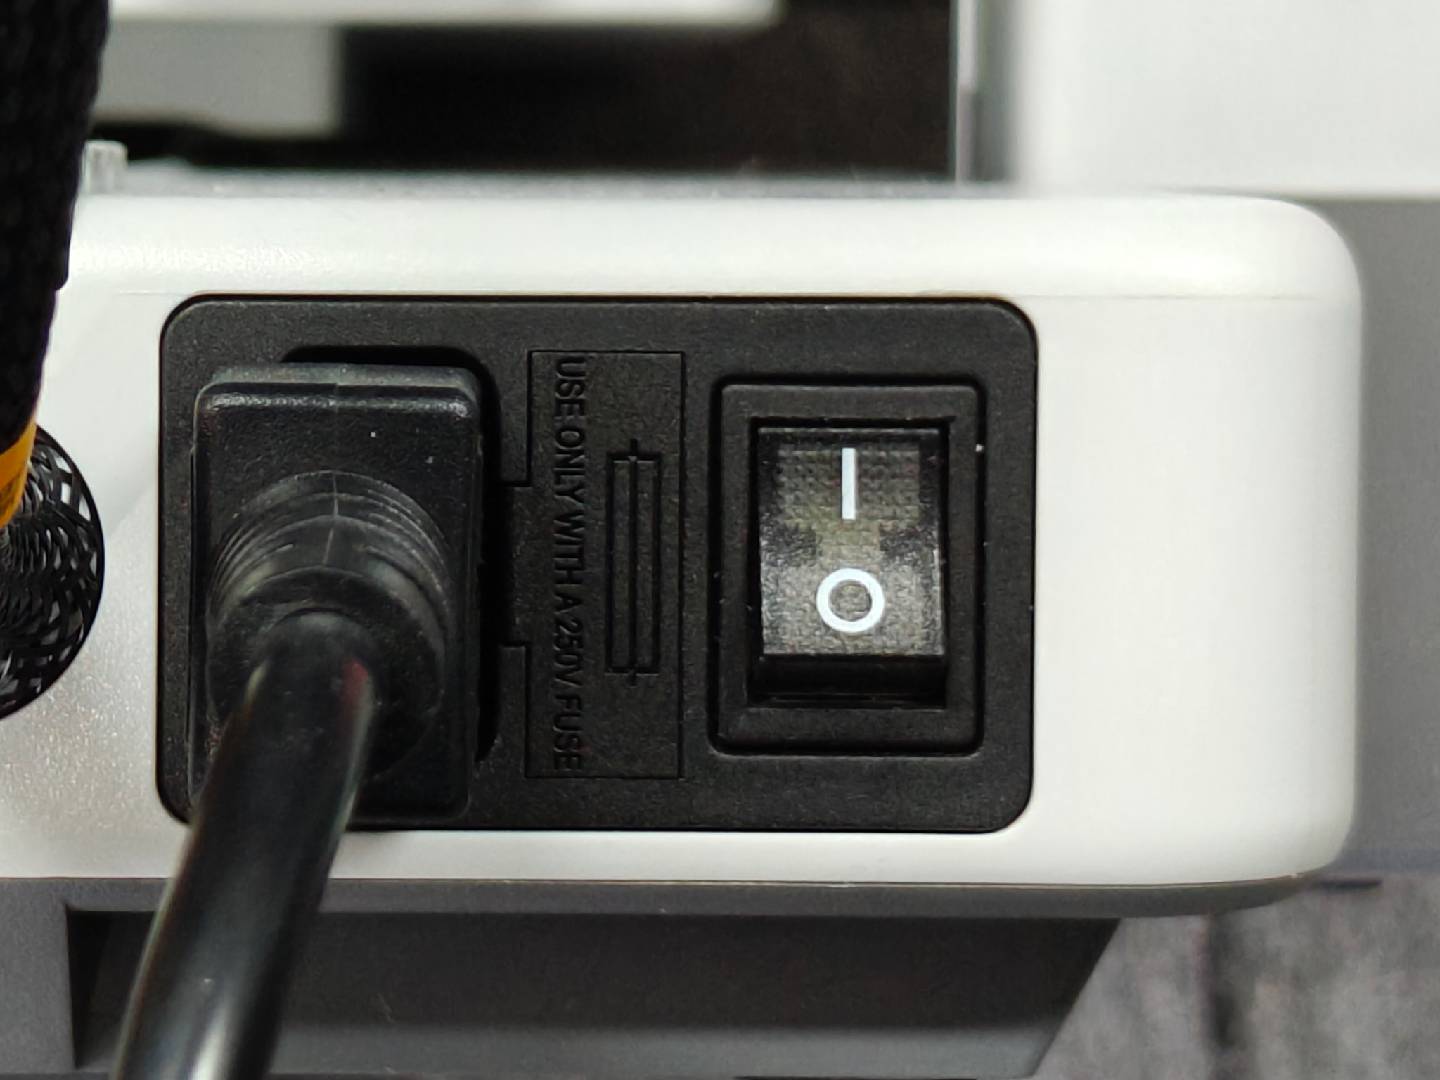
¶ 1. Device Fuse Blown
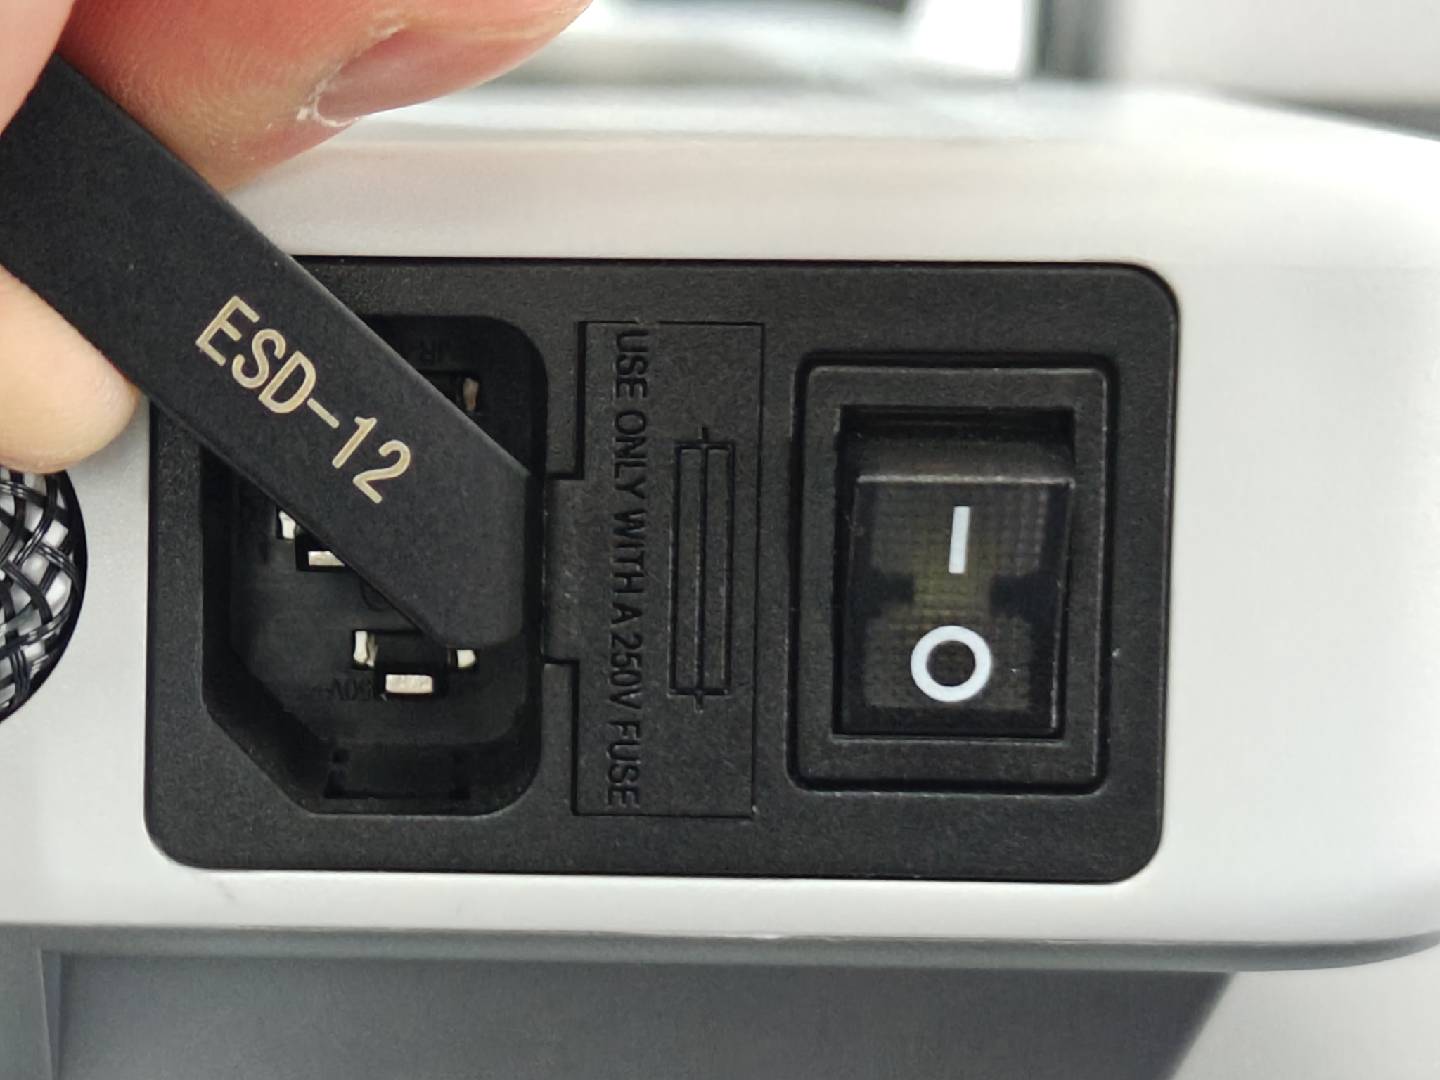
First, you need to open the fuse box and check whether there are signs of fuse blowing.
You can use tweezers or a flat - head pry bar to open the fuse box. If there is a blown situation, you need to replace the fuse.
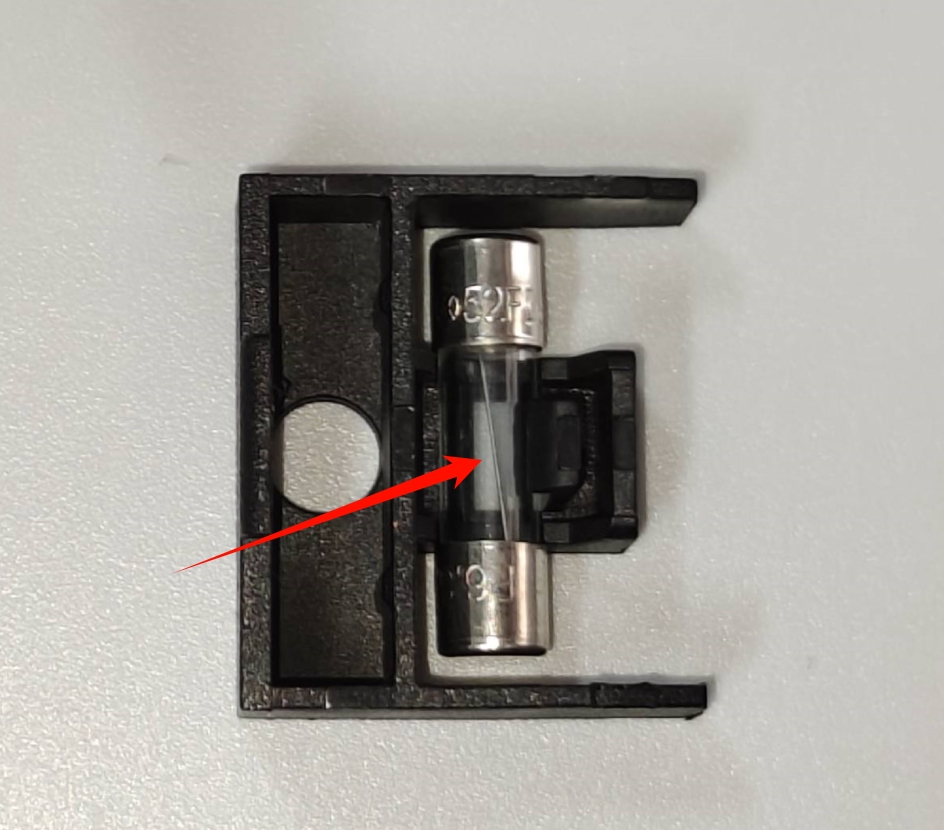
The following figure shows the normal fuse and fuse base.
If the fuse blows, the middle thin wire will be disconnected.
 |
 |
¶ 2. Power Switch Damage
This situation is usually caused by poor contact or spring corrosion.
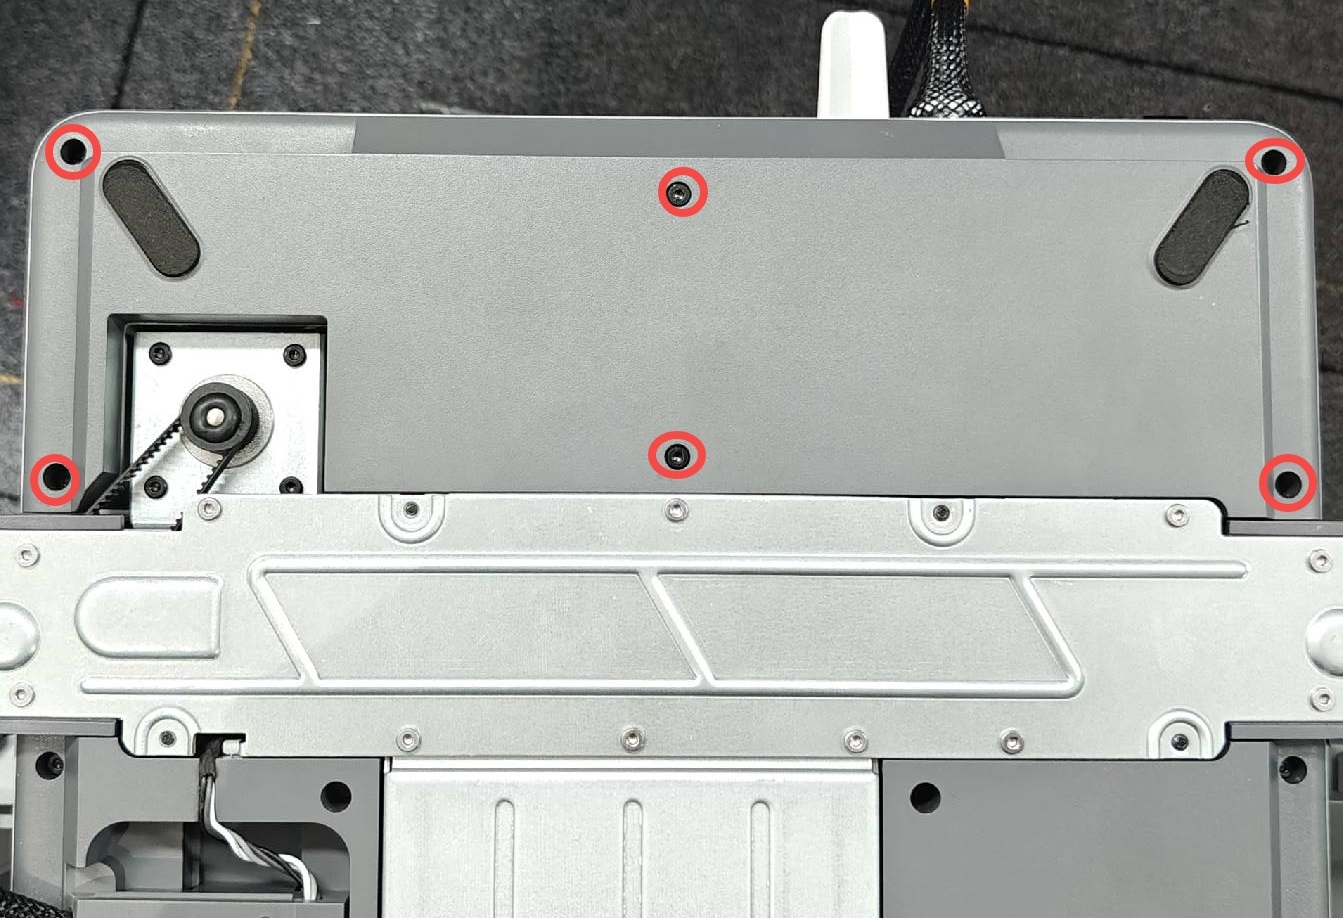
Remove the six screws on the bottom shell, open the bottom shell, and then check whether there is any looseness in the cables behind and whether the spring is normal.
 |
 |
If the wiring is normal and the terminal spring is not corroded, it may be an internal abnormality of the switch. It is recommended to replace the power switch component.
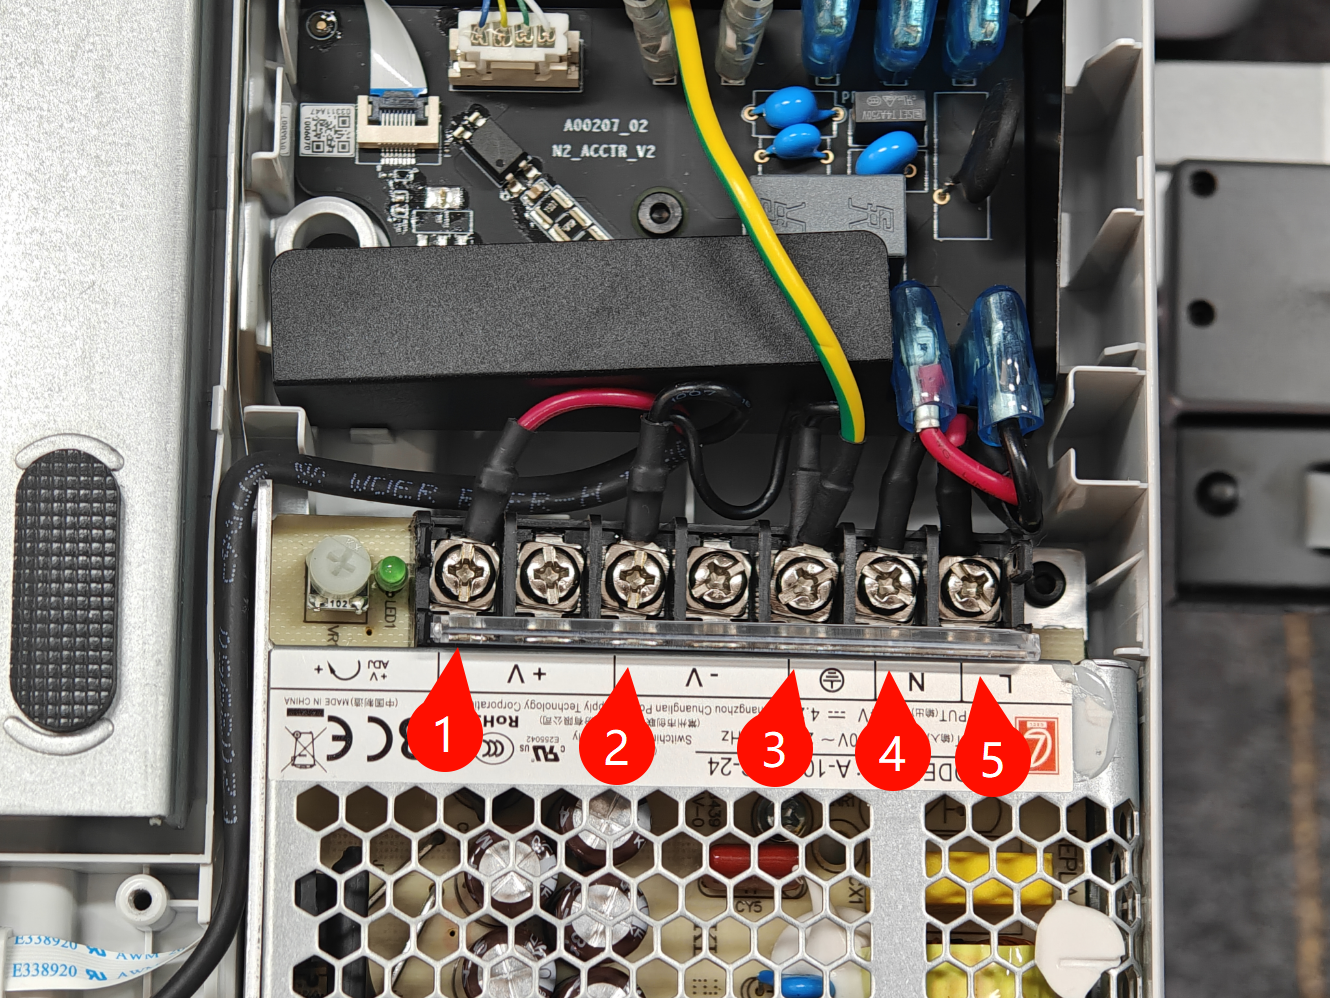
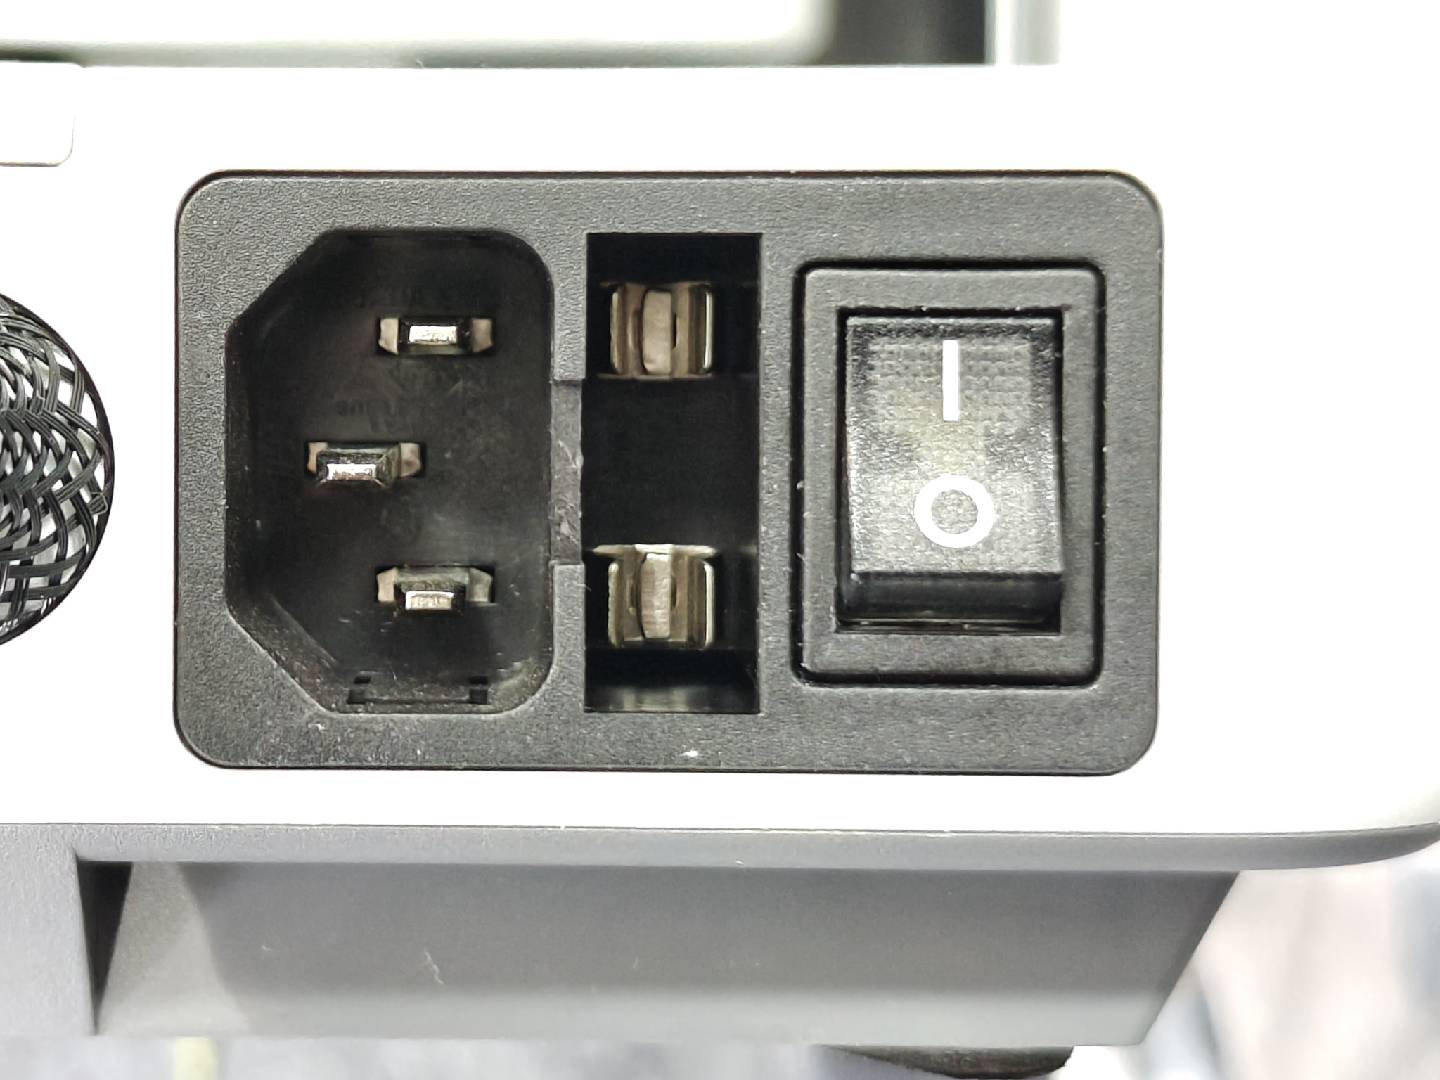
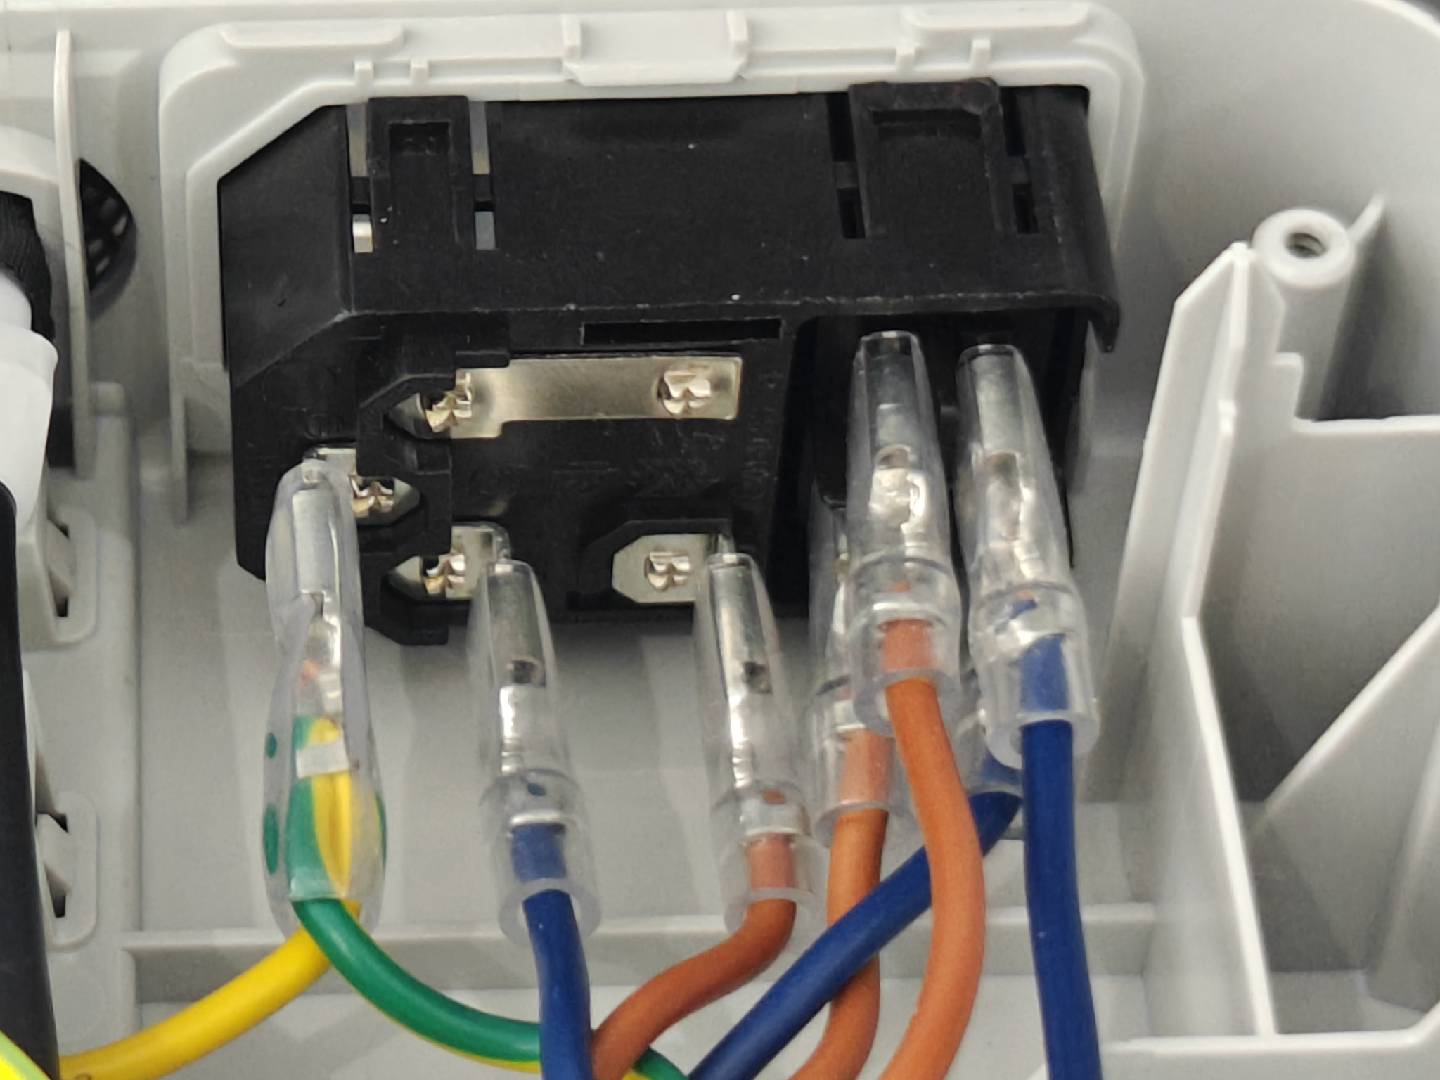
If you have a multimeter, you can measure whether there is an AC power input at terminals #4 and #5 of the power module to further confirm. The normal input voltage range is 100 - 240V.
#5 (L) is the live wire
#4 (N) is the neutral wire
Note: This is an AC high - voltage area. Be careful when measuring. During measurement, pay attention not to touch the two test pens together, which will cause a short circuit in the power supply.

¶ End Notes
We hope that the detailed guide we shared with you was helpful and informative.
We want to ensure that you can perform it safely and effectively. If you have any concerns or questions regarding the process described in this article, we encourage you to reach out to our friendly customer service team before starting the operation. Our team is always ready to help you and answer any questions you may have.
Click here to open a new ticket in our Support Page.
We will do our best to respond promptly and provide you with the assistance you need.