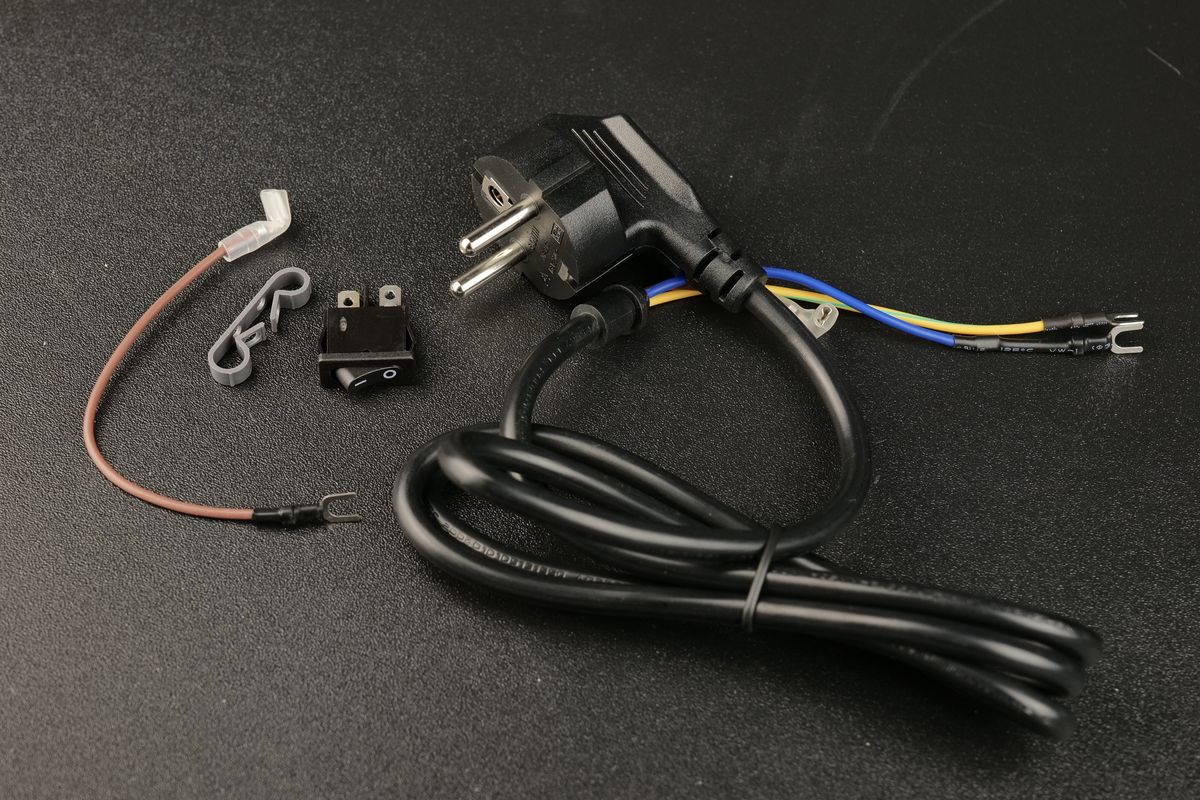
In this guide we will show the process of replacing the Power Cable and Power Switch on the A1 mini
¶ When to use?
This guide should be used if the Power Cable of the A1 mini is faulty, and needs to be replaced.
Common issues that are caused by the A1 mini Power Cable are:
- The Power Cable is damaged
- Power Switch is damaged
- Recommended by Bambu Lab Customer Support
¶ Tools and materials needed
Bambu Lab Power Cable for A1 mini
- H2.0 hex wrench
- PH2 Philips screwdriver
- 20 minutes of your time
¶ Safety Warning
IMPORTANT!
It's crucial to power off the printer before performing any maintenance work on the printer and its electronics, including tool head wires, because leaving the printer on while conducting such tasks can cause a short circuit, which can lead to additional electronic damage and safety hazards.
When you perform maintenane or troubleshooting on the printer, you may be required to disassemble some parts, including the hotend. This process can expose wires and electrical components that could potentially short circuit if they come into contact with each other or with other metal or electronic components while the printer is still on. This can damage the electronics of the printer and cause further damage.
Therefore, it's essential to switch off the printer and disconnect it from the power source before doing any maintenance work. This will prevent any short circuits or damage to the printer's electronics. By doing so, you can avoid potential damage to the printer's electronic components and ensure that the maintenance work is performed safely and effectively.
If you have any concerns or questions about following this guide, open a new ticket in our Support Page and we will do our best to respond promptly and provide you with the assistance you need.
¶ Steps to remove the old Power Cable
¶ 1. Remove the printer's bottom housing cover
Place the printer on its side, with the Z axis pillar facing the table.
Then, remove the 16 screws holding the bottom cover in place, to access the MC board fan.
Please note that screws 15 and 16 are different, so keep track of them for when you will re-assemble the bottom cover.
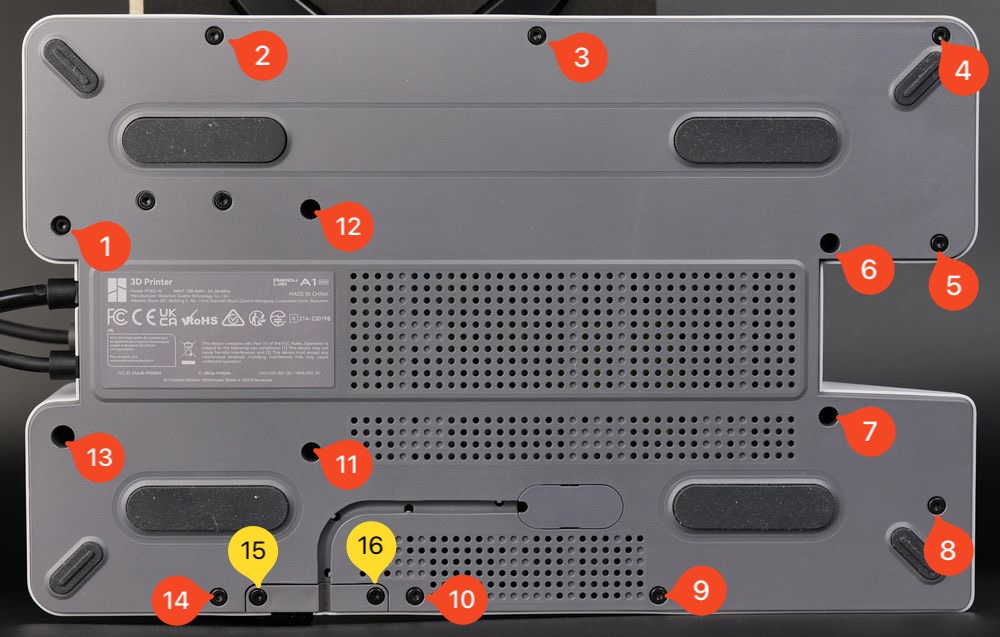
After removing the screws, gently pry out the plastic bottom cover.
You can start from the top right side, and gently work your way around the printer until the cover gets loose.
¶ 2. Remove the plastic wire cover
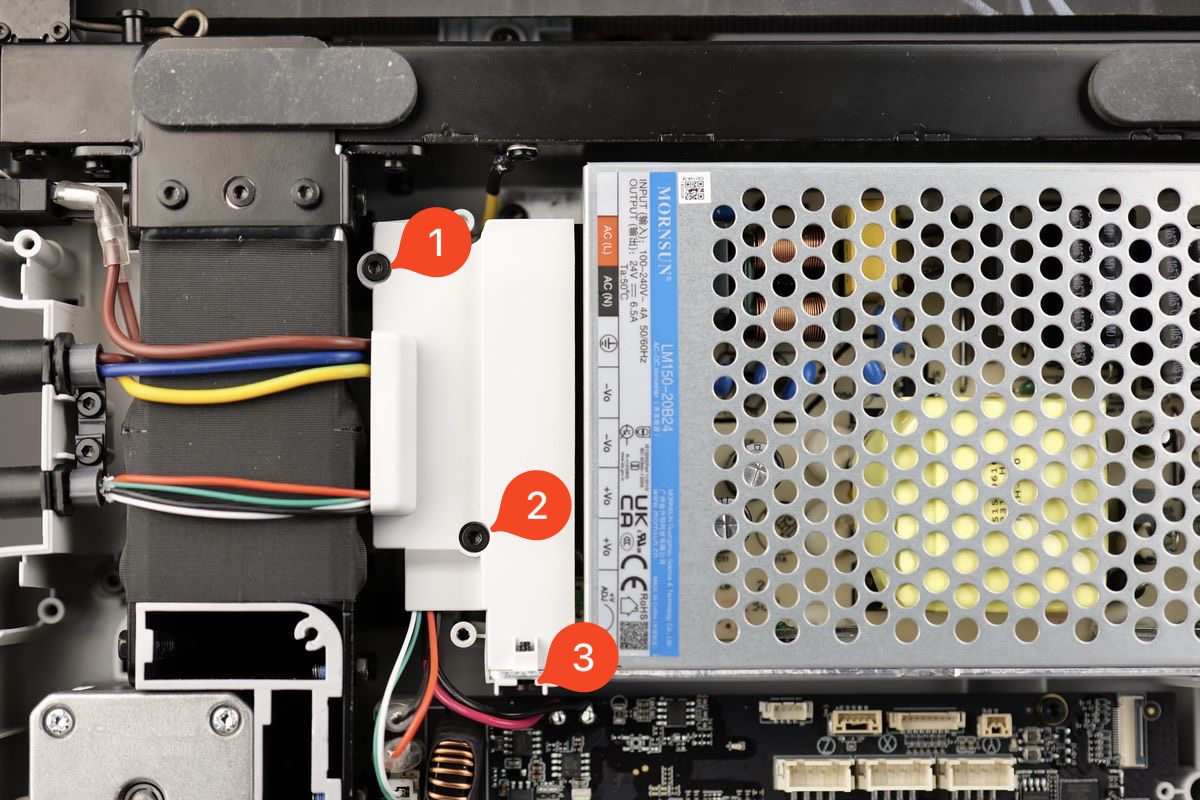
Carefully remove the three screws holding the plastic wire cover in place to access the power terminals of the Power Supply.
Please note that screw nr. 3 is on the side.
¶ 3. Remove the Power Switch
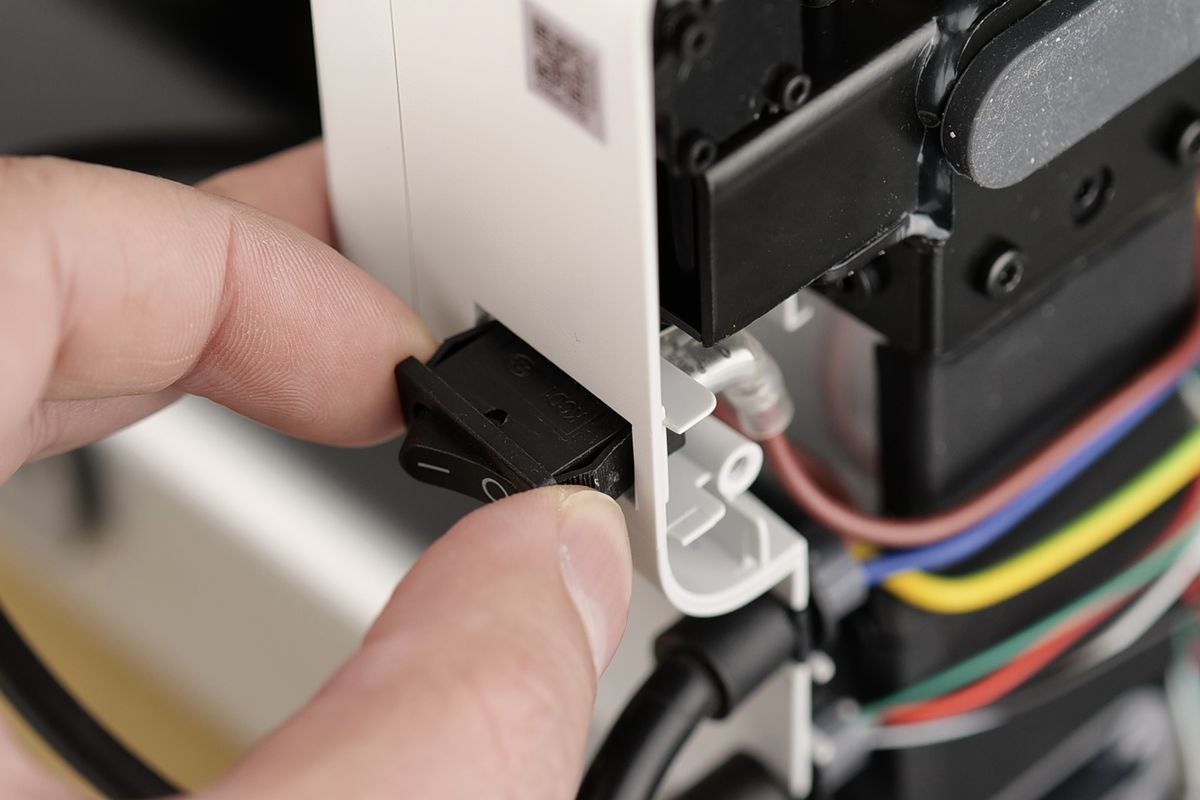
Carefully push on the side black section of the power switch. This will release the small clip holding the switch in place.
At the same time, also push the switch towards the back of the printer. The goal is to only push it back half way.
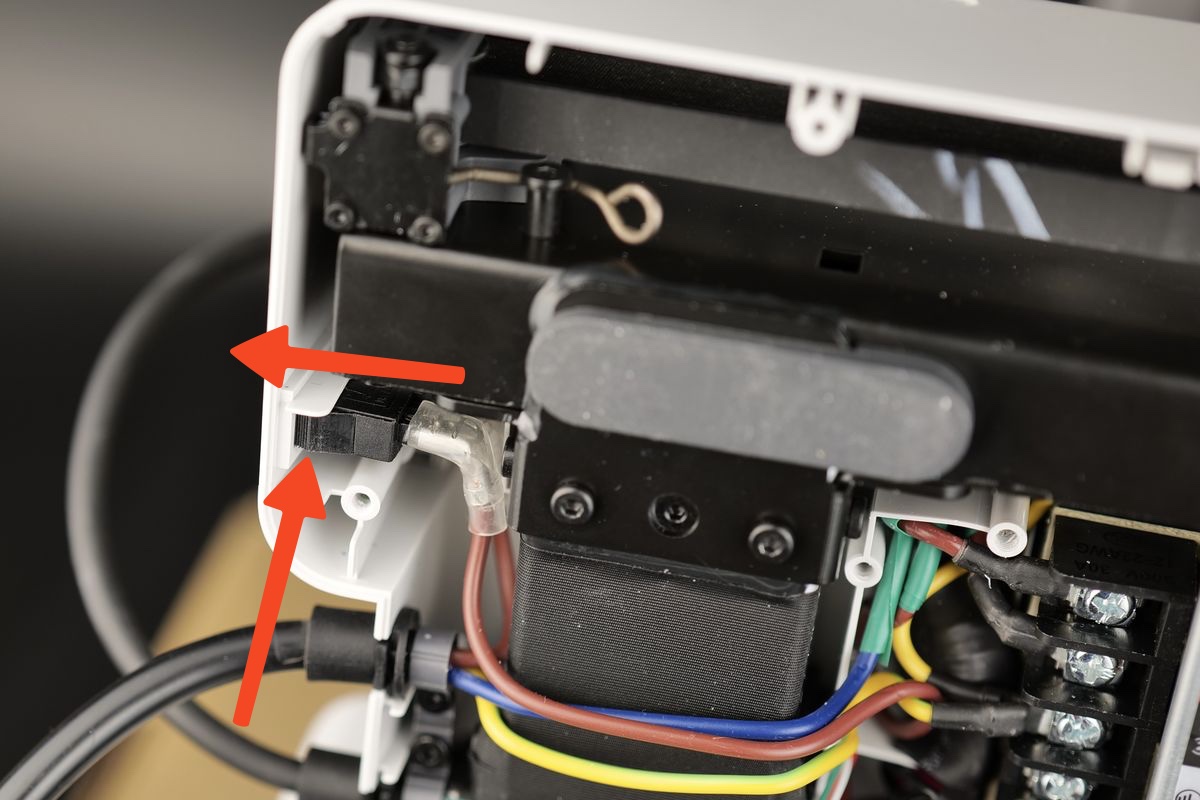
If successful, you should stop when the back side of the power switch is like this, so you can remove the wires in the next step.
¶ 4. Disconnect the Power Switch wires
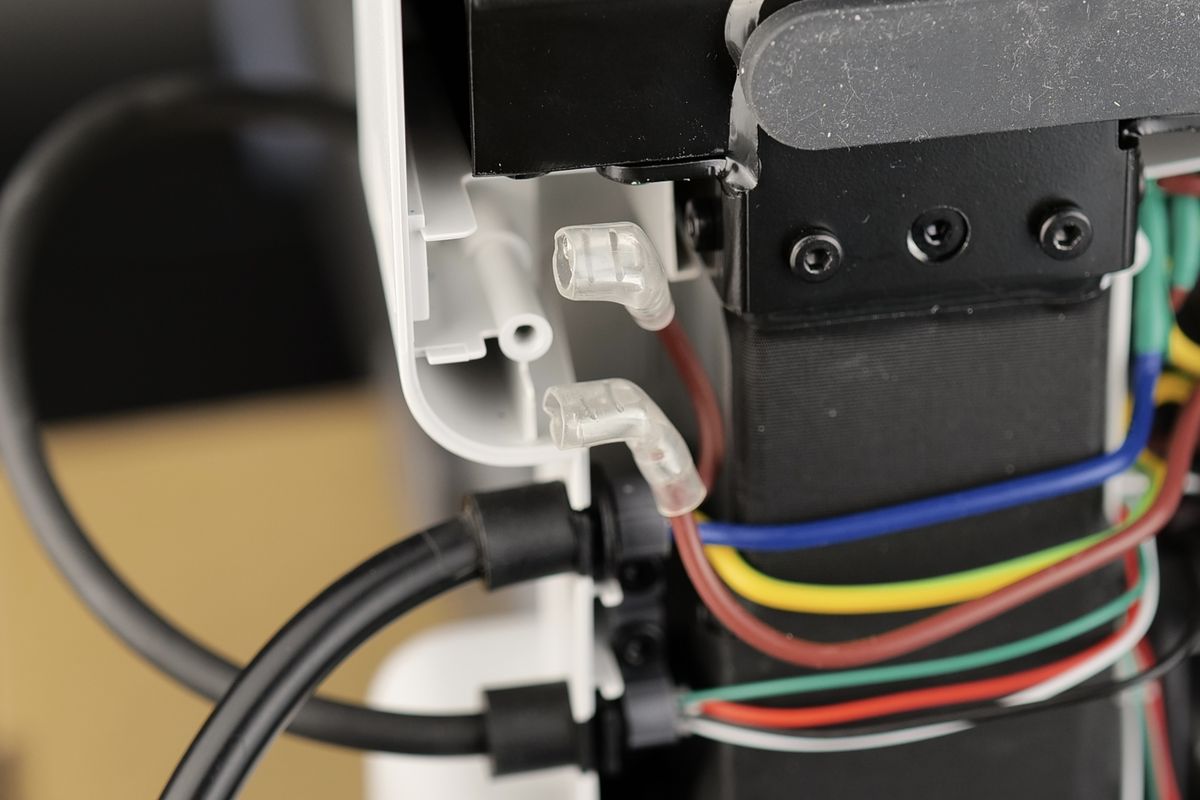
While holding the switch firmly, you can start to disconnect the brown wires. They can be disconnected using your fingers but a set of pliers can also help.
Once disconnected, you can remove the power switch completely.
¶ 5. Disconnect the Power Cable wires from the Power Supply
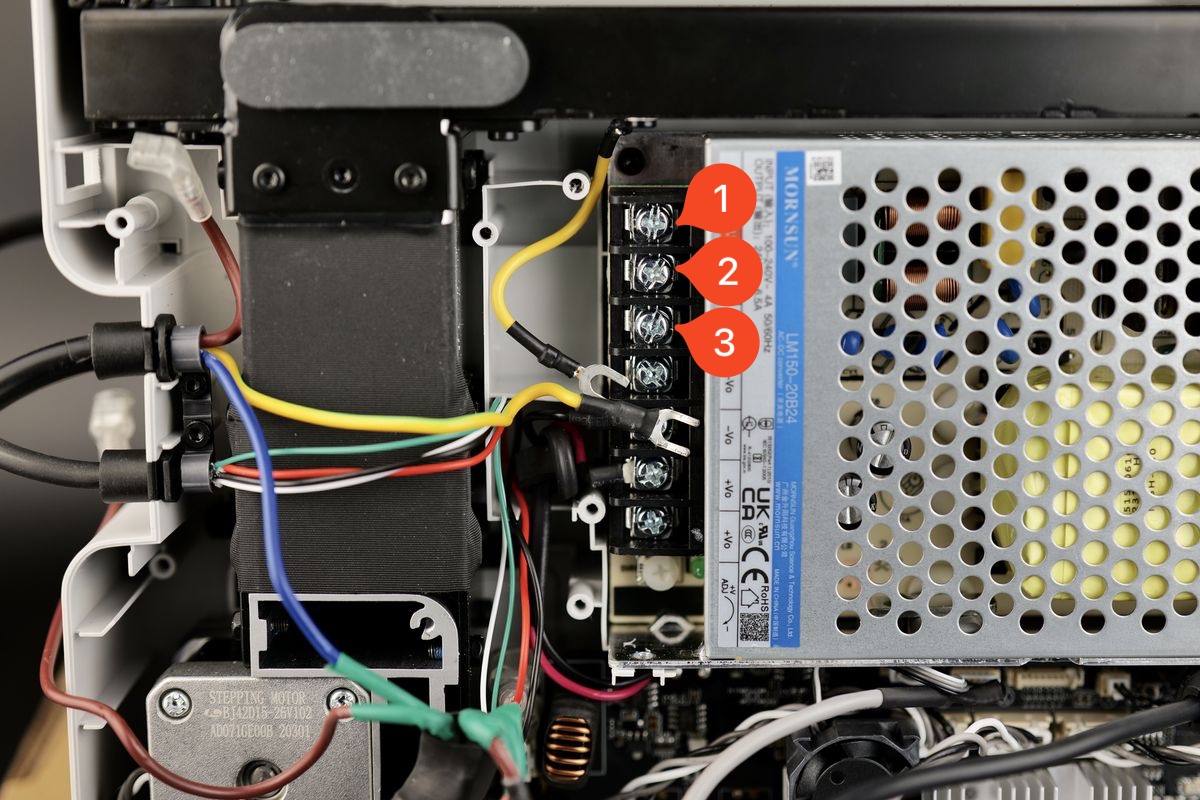
Loosen the three power terminal screws from the power supply, then remove the power cable wires
¶ 6. Remove the Power Cable from the printer
Finally, remove the power cable from the printer, by first removing the screw holding it attached to the frame of the printer.
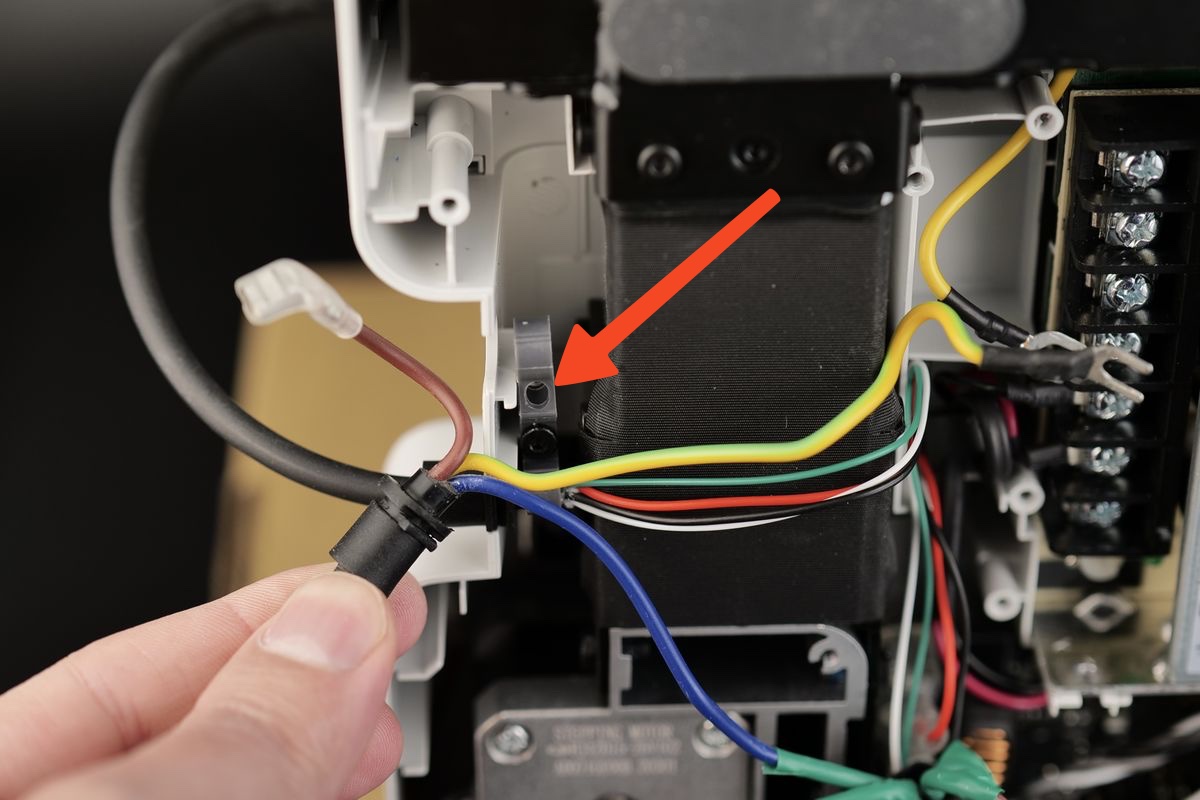
The power cable is now removed
¶ Steps to install the new Power Cable
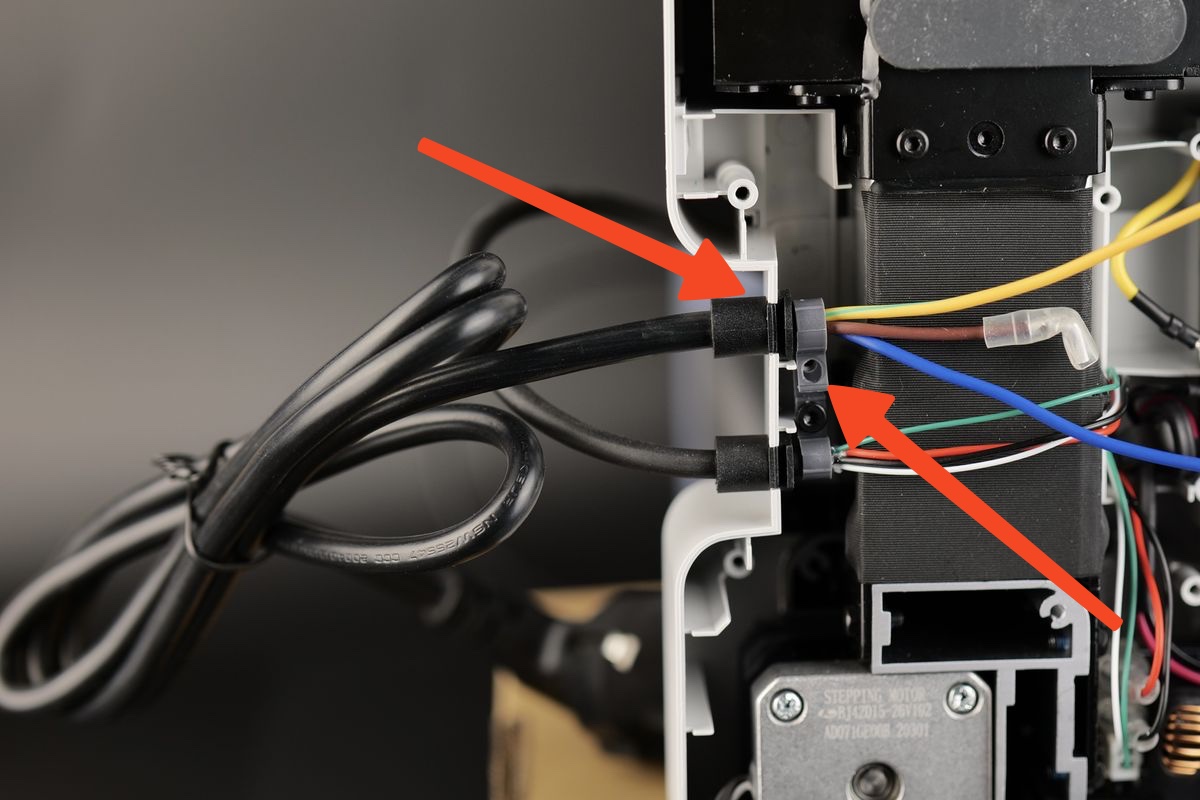
¶ 1. Attach the Heatbed cable to the printer
Carefully route the cable on the bracket, then tighten the screw while making sure not to overtighten it.
Ensure that the flat section of the cable is facing the base of the printer as shown in the image.
¶ 2. Install the Power Switch
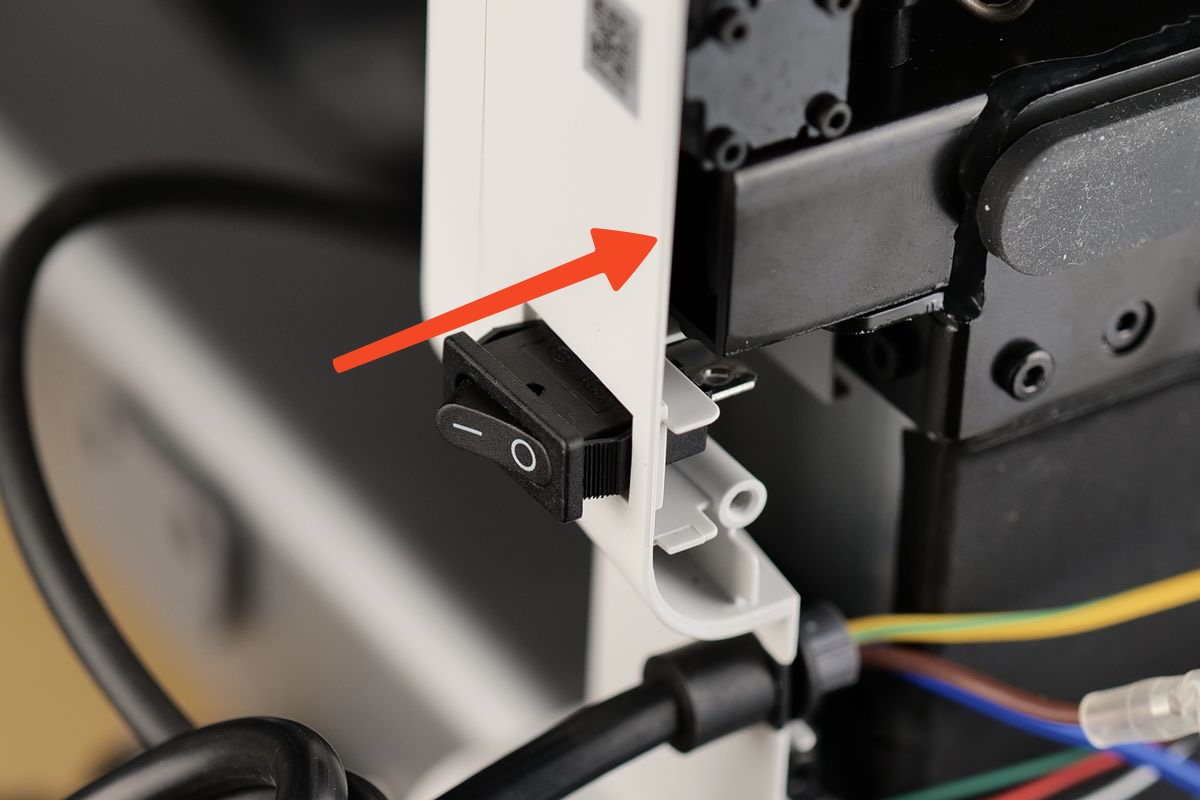
Push the power switch halfway in the printer housing, while ensuring the Off position is towards the bottom of the printer.
Avoid pushing it completely, as in the next step, you need space to
¶ 3. Attach the brown wires to the switch
In this step, you need to re-attach the brown wires to the switch.
First, install the wire which is attached to the power cable. This will go on the pin in the back.
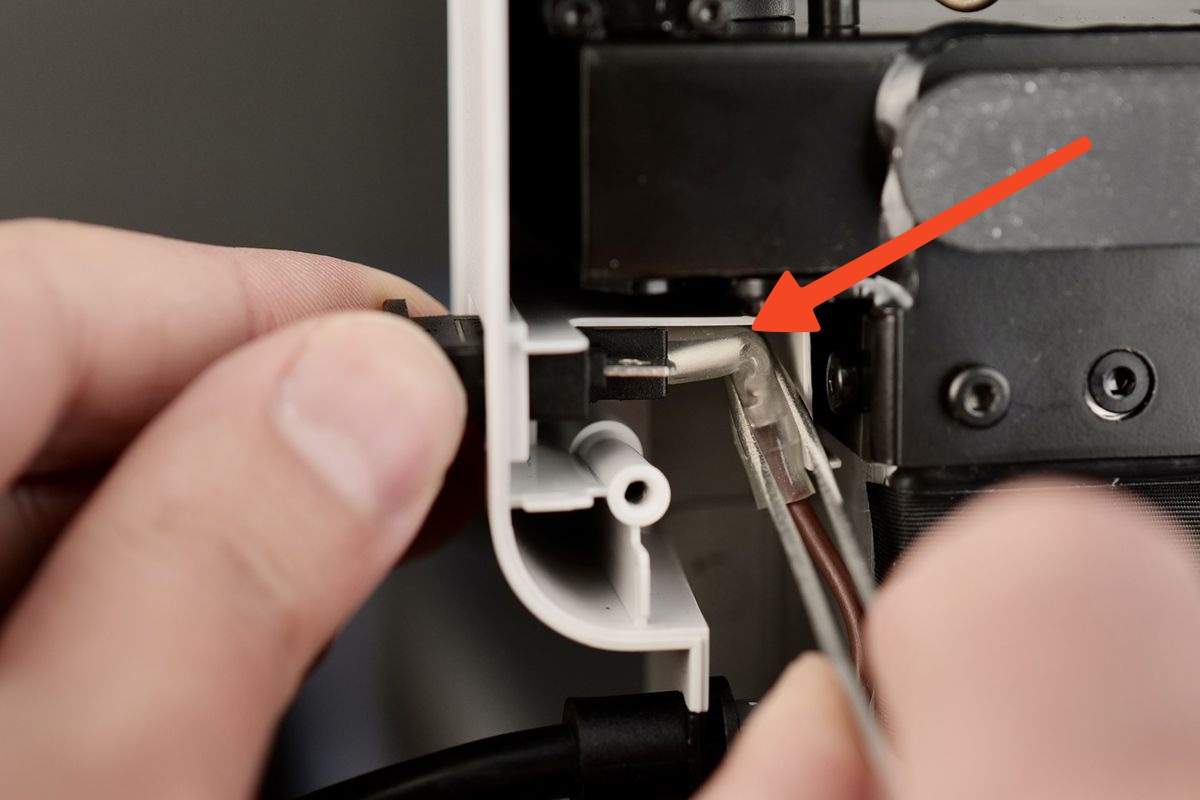
Next, install the small brown wire which you received in the package on the power switch, as shown in the image below.
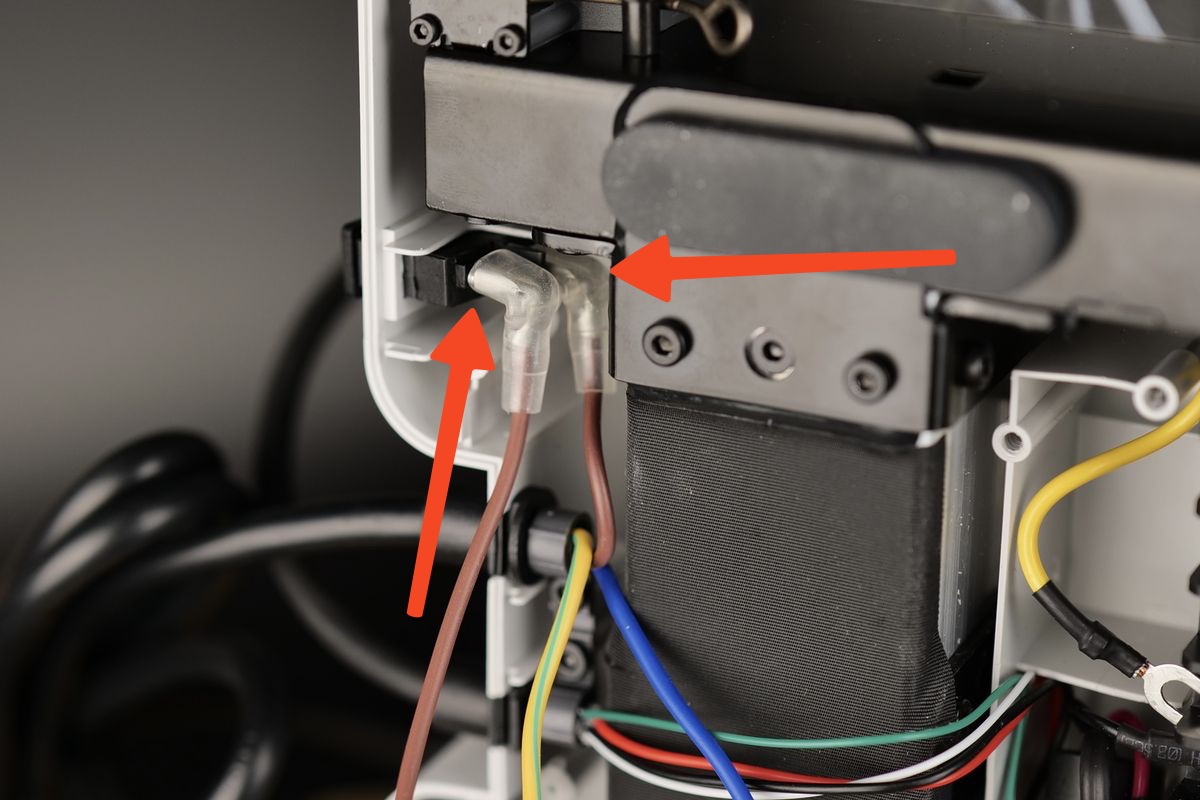
With both wires installed, you can push the power switch to lock it in place on the printer body, then move to the next step.
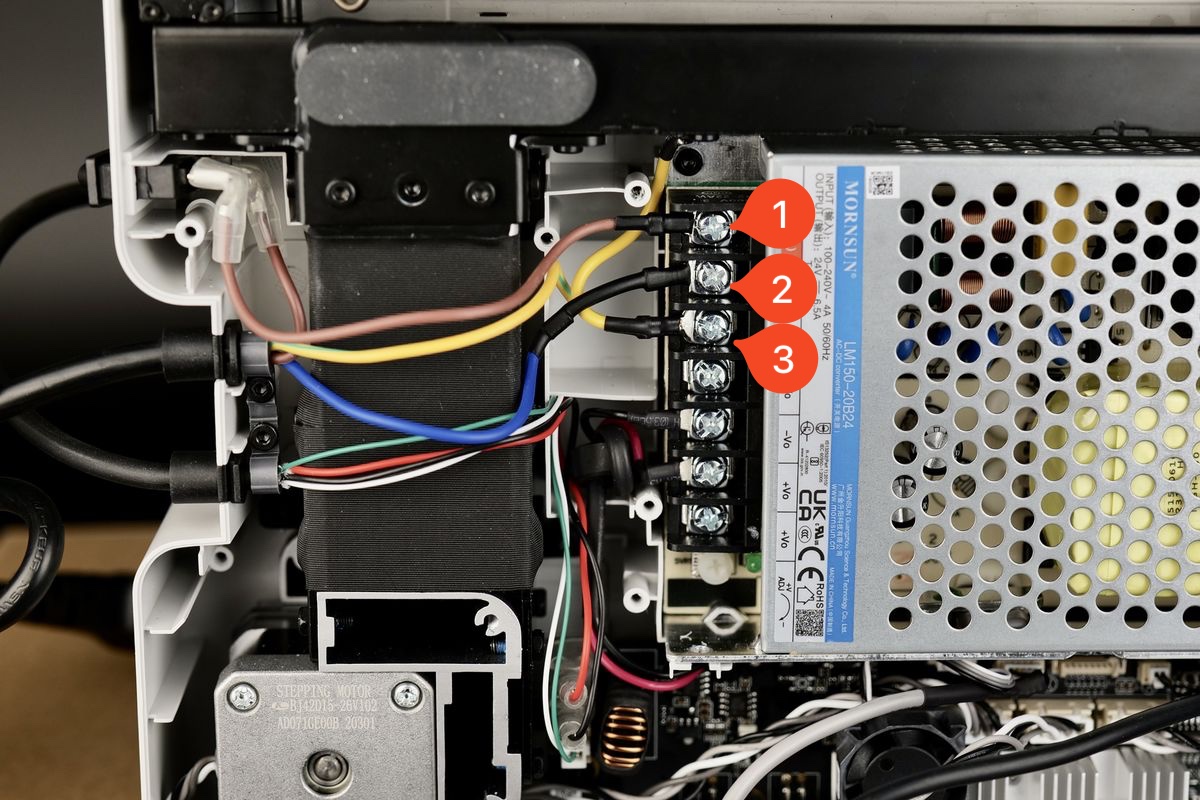
¶ 4. Attach the Power Cable wires to the Power Supply terminals
Carefully re-connect the power terminal wires as shown below and tighten the screws.
The wire information is as follows:
1. AC Live Wire (Brown)
2. AC Neutral Wire (Blue)
3. Power cable Ground Wire and Frame Board Wire (Yellow)
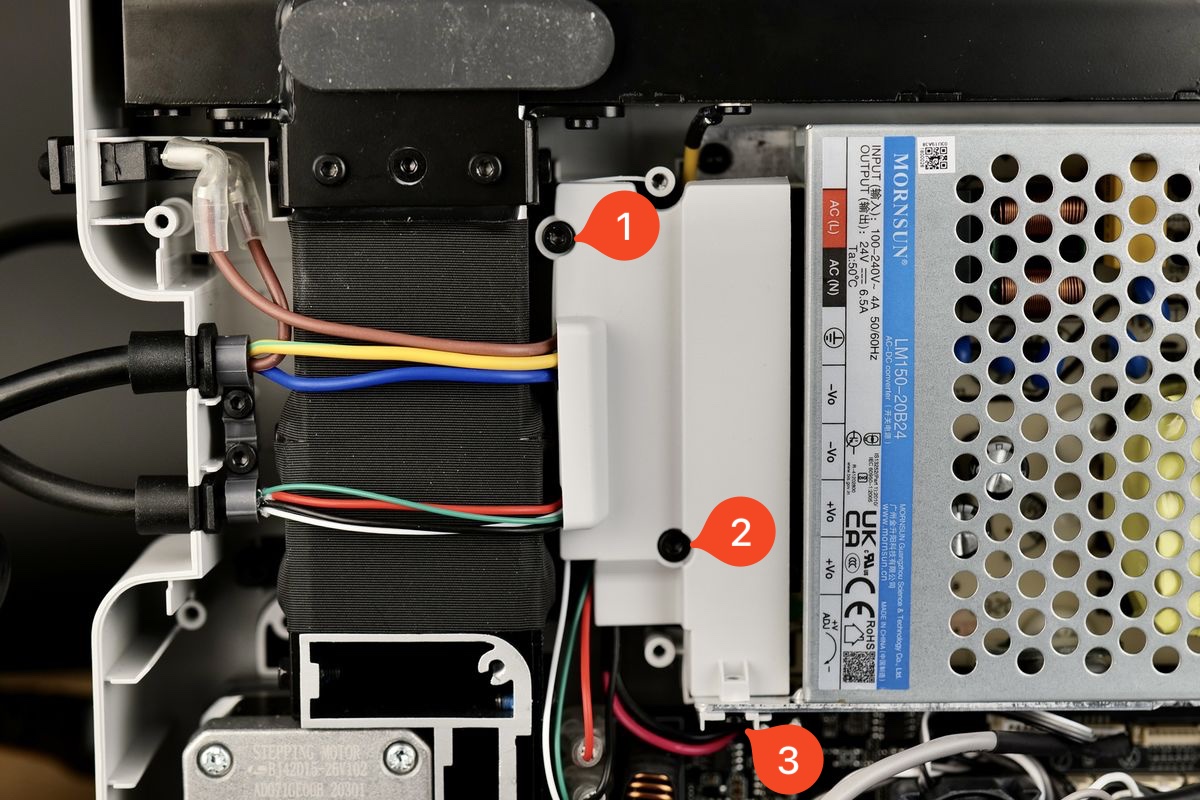
¶ 5. Install the screws holding the plastic wire cover in place.
Arrange the wires coming from the heatbed cable and power cable as shown in the image, then re-attach the plastic cover back to the printer using the three screws
These screws will be threaded inside plastic standoffs. Avoid over-tightening them as you can damage the plastic threads.
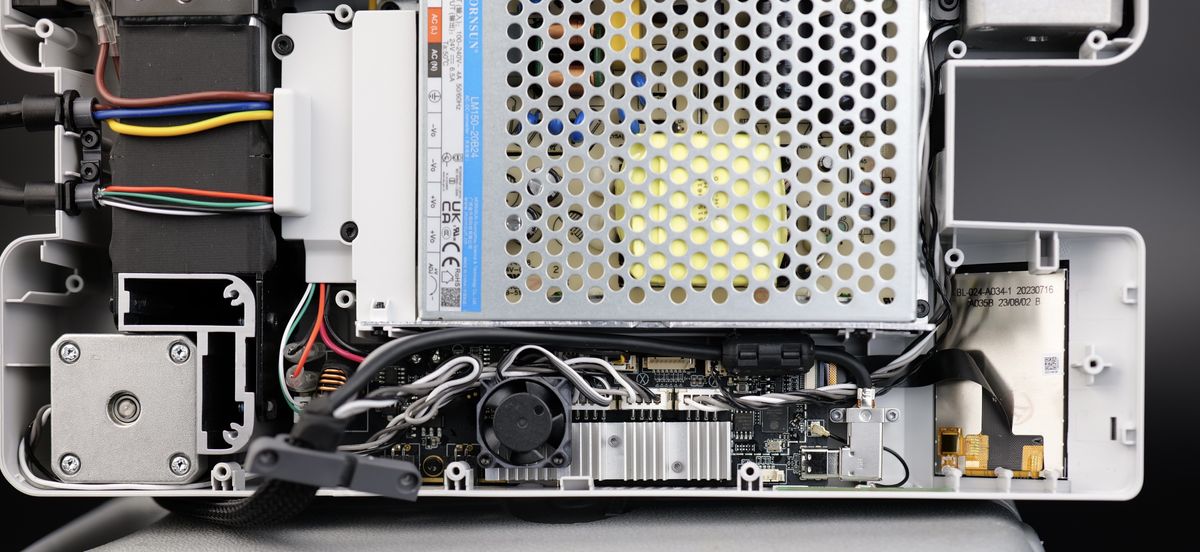
¶ 6. Perform some wire management
Before putting the bottom cover back in place, ensure that the MC board wires are routed correctly, so they do not interfere with the MC board fan, as shown in the image below.
¶ 7. Install the back cover
You can now proceed with installing the bottom cover back to the printer.
Start by tightening screws 15 and 16 to ensure the side wire loom sits correctly.
Then, proceed with installing the other remaining screws, while ensuring you do not over-tighten them.

¶ Verify the functionality
To ensure everything works as expected, turn on the printer and confirm it powers on.
This confirms the installation was correct.
¶ Calibration step after the operation
No calibration is necessary.
¶ Potential problems and solutions
If you encounter problems during the installation of a new Power Cable / Power Switch, please check the potential problems and solutions listed below:
¶ There printer doesn't power on
Check the cable connections done in Step 3 and Step 4 and confirm the wires are plugged correctly
¶ End Notes
We hope that the detailed guide we shared with you was helpful and informative.
We want to ensure that you can perform it safely and effectively. If you have any concerns or questions regarding the process described in this article, we encourage you to reach out to our friendly customer service team before starting the operation. Our team is always ready to help you and answer any questions you may have.
Click here to open a new ticket in our Support Page.
We will do our best to respond promptly and provide you with the assistance you need.